Skip to content

How to test application with ZAP – Part Four

This is the last article in the ZAP series. In this piece, I will explain some of the main features of ZAP I didn’t cover in the previous part. Before we even start, I will remind you that this tool should be used just on the applications created for testing or the applications you would need to test.

We will divide this part of the series to cover a few topics:

  • Sessions
  • Generating Vulnerability Assessment Reports
  • Passive Scanning
  • Active Scanning
  • Scan Policy Manager

Sessions

In the second part of the ZAP series, I mentioned sessions when we ran ZAP for the first time. I will summarize that.

When you run the ZAP tool, this window will pop up:

I will also paste some explanation from the mentioned article about the third option when you don’t want to save the session:

We can select no, and if we want to save the session, we can do it at a later time.

If you choose to save the session, it will be saved to the disk in an HSQLDB database. The database gets a default location and name. You can access the db later. If you don’t persist a session, the files are deleted once you exit ZAP.


If we choose the first option: Yes, I want to persist this session with name based on the current timestamp the session will be stored in db folder directly and name will be based on the current timestamp. Mainly the mentioned folder where sessions will be stored is located in “%HOMEPATH%\OWASP ZAP\sessions” if you are using Windows or Kali, it is usually like in the picture below.

If we close the saved ZAP session and we want to open some other saved session, we should click on File > Open Session and find the session in its appropriate path.

If we choose the second option: Yes, I want to persist this session, but I want to specify the name and location new window will appear where you can type the desired fields. There is also a way to create a new session by clicking on the File tab > Persist Session. You can choose the location and the session’s name in the pop-up window.

There is also an option to compare two sessions. We can compare the current(opened) session with some previously saved ones by clicking on the Report tab > Compare with another session.

The other option ZAP provides is modifying the saved (current) session. That can be achieved by clicking on File > Snapshot Session As. Please don’t let the name “snapshot” fool you; imagine this option as Save As.

In pentesting, it is very important to organize your tests, so creating sessions will help you with better organization.

Next thing which is important for pentesters is making vulnerability assessment reports.

Generating Vulnerability Assessment Reports

This feature is not just important to provide for the management or the stakeholders. It is also important to collect history records of testing during the time so you can compare reports and make a conclusion about it.

When security testing is finished and you collect all results, you can start generating the report.

It is very important that we leave the sites we want to include in the report in the side tree (we can select all unnecessary sites and delete them). Then we will click on the Report tab > Generate Report, and the next window appears.

There are a few sections/tabs you can see. In the scope tab, you fill out basic information regarding the report file, but in other tabs: Template and Filter, you can specify what report will include.

The report will be saved as HTML and opened in the browser. It will be divided into sections you choose in the Template section.

There will be section Summaries, and you will be able to see, for example alert counts by alert type:


Passive Scanning

ZAP automatically performs Passive Scanning in the background thread by scanning all HTTP requests and responses. It doesn’t change the requests or the responses in any way.

Passive Scan Report Rules define what kind of vulnerabilities to check in the background.

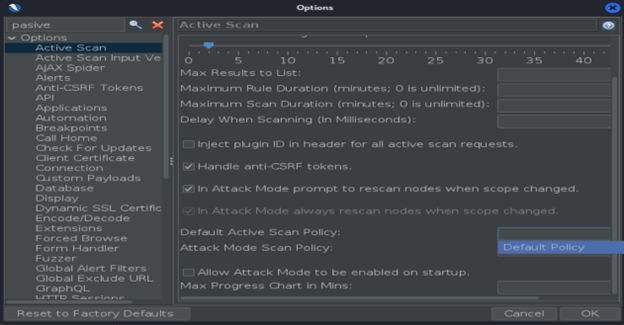
To check out the Passive Scan Rules list, go to Tools > Options > Passive Scan Rules

Check out the list! Here you can also manage how ZAP will perform the scan – you can choose the threshold of all vulnerabilities. A Passive Scanner is also an option where you can set up the

All options can be seen in the picture, and you can manage if the scan will be performed just for some specific scope, the maximum number of alerts, etc. For more information about passive scan options, you can check out this site.

There is also a useful option called Passive Scan Tags. To read more about it you can visit this site.

Active Scanning

Active scanning attempts to find potential vulnerabilities by using known attacks against the selected targets – by OWASP.

*Note that logical vulnerabilities such as broken access control will not be found! And if you want to have better results, manual penetration testing should always be performed in addition.

Active Scan Rules define what kind of vulnerabilities to check for when attacking an application.

To check out the Active Scan Rules feature, go to Tools > Options > Active Scan.

The Active scan will include the following vulnerabilities: .htaccess information leak, Code injection, Command injection, XSS, directory browsing (can lead to directory traversal attack), SQL injection, etc. Also, you can set up a custom policy you want to use when active scanning. Policies will be explained in the next chapter.

You can read more about passive scan options on this site. To determine what will ZAP attack, you can check out option Active Scan Input Vectors:

Scan Policy Manager

I have mentioned Scan Policy Manager, but what is it?

Scan Policy defines which rules will be run as part of an active scan, how many requests are to be made, and how likely potential issues will be flagged. There is no limit to defining the number of scan policies. Also, as you saw, you can define the default policy to be used for active scans and the attack mode.

To configure policies, go to Analyze tab > Scan Policy Manager, where you can Add, Modify, Remove, and Import/Export policies.

If you want to add a new policy, you can configure it easily. For example, if for your active scan you would like to perform the scan to check out CRLF Injection, you will go to Injection Section and under CRLF Injection, choose Threshold High, and for other injections, choose OFF.

When you finish with the setup, if you would like to perform an active scan with the newly created policy, you can do it like this:

Then click on the Active Scan, choose a policy, and Start Scan!

Conclusion

This is the end of the ZAP short series!

There are plenty of tutorials for using ZAP, and there is the official documentation on the OWASP site you can check out for more better understanding of this tool.

I also wanted to mention that ZAP has some free features that are not free in other security tools, such as Burp Suite. So, familiarize yourself with the pros and cons of security tools you can use before you start. You can and should always use more security tools along with manual testing if you want to get the best results.

Enjoy your ZAP ride!

#ZAP #Sessions #Pasive_scanning #Active_scanning

Cover photo by Markus Winkler

About Version 2 Digital

Version 2 Digital is one of the most dynamic IT companies in Asia. The company distributes a wide range of IT products across various areas including cyber security, cloud, data protection, end points, infrastructures, system monitoring, storage, networking, business productivity and communication products.

Through an extensive network of channels, point of sales, resellers, and partnership companies, Version 2 offers quality products and services which are highly acclaimed in the market. Its customers cover a wide spectrum which include Global 1000 enterprises, regional listed companies, different vertical industries, public utilities, Government, a vast number of successful SMEs, and consumers in various Asian cities.

About VRX
VRX is a consolidated vulnerability management platform that protects assets in real time. Its rich, integrated features efficiently pinpoint and remediate the largest risks to your cyber infrastructure. Resolve the most pressing threats with efficient automation features and precise contextual analysis.

FIRST’s Traffic Light Protocol 2.0

No, TLP is not an American girl band from the 90’s. It’s an acronym for Traffic Light Protocol, a method for sources to signify any limitations regarding the further spread of the information being shared.

Meant to facilitate and simplify information exchange, TLP is widely used by Computer Security Incident Response Teams (CSIRT) within the European Union.

For TLP, simplicity is key. Whoever is sharing information tags the document, presentation, email, phone call, or meeting in a dimly lit pub with “TLP:COLOR.” Yes, TLP encompasses all forms of information: written, visual, verbal and potentially telepathic.

Recently, the Forum of Incident Response and Security Teams (FIRST) decided to update the five-year-old protocol with version 2.0, hoping to optimize it by

– Removing “synonyms and colloquialisms to improve accessibility for non-native English speakers.”

– Focusing “on consistent language and terminology, adding definitions for community, organization, and clients.”

– Adding “a colors table to include RGB, CMYK, and hexadecimal color codes.”

– Changing TLP:WHITE to TLP:CLEAR and adding an additional “Strict” label to TLP:AMBER to denote information that should only be shared with the recipient’s organization.

Why the update? Well, according to Don Stikvoort, the FIRST TLP-SIG co-chair, “We are increasingly spreading more confidential and sensitive information inside our community, inside companies, inside business sectors, inside countries, and worldwide. We need systems that are easy to use, simple to understand, and straightforward enough that translation does not impact the meaning to ensure that we share sensitive information with the appropriate audience. The updated and modernized TLP version 2.0 does just that.”

Simple enough.

  • TLP:RED = Not for disclosure, restricted to participants only. For example, information shared within a meeting is limited to those present at the meeting.
  • TLP:AMBER = Limited disclosure, restricted to participants’ organizations, and clients and customers that need to know the information in order to protect themselves or prevent further harm.
  • TLP:AMBER+STRICT restricts the sharing of information by the recipient to the recipient’s organization..
  • TLP:GREEN = Limited disclosure, restricted to a recipient’s community. Recipients can share information with peers and partner organizations within their sector, but not through in-band channels.
  • TLP:CLEAR  = Recipients could yell this information into a bullhorn in Times Square, information can be distributed without restriction.

It’s important to note that the Traffic Light Protocol has no legal weight and is not meant to trump any legislation regarding data sharing and classification. Don’t mix TLP with Confidential, Secret and Top Secret tags.

A further word of warning from the European Union Agency for Cybersecurity (ENISA):

“Sharers must not succumb to the power that this control gives them. It is easy to tag everything as TLP:RED and be done with it. It is also useless, as it will make most receivers unable to act on the information they get. Moreover, over-tagging will quickly be detrimental to the sharer’s reputation and the trust they get from the community.”

#FIRST #ENISA #CSIRT #TLP #Information_Sharing

Photo by Jonny Rogers on Unsplash

About Version 2 Digital

Version 2 Digital is one of the most dynamic IT companies in Asia. The company distributes a wide range of IT products across various areas including cyber security, cloud, data protection, end points, infrastructures, system monitoring, storage, networking, business productivity and communication products.

Through an extensive network of channels, point of sales, resellers, and partnership companies, Version 2 offers quality products and services which are highly acclaimed in the market. Its customers cover a wide spectrum which include Global 1000 enterprises, regional listed companies, different vertical industries, public utilities, Government, a vast number of successful SMEs, and consumers in various Asian cities.

About VRX
VRX is a consolidated vulnerability management platform that protects assets in real time. Its rich, integrated features efficiently pinpoint and remediate the largest risks to your cyber infrastructure. Resolve the most pressing threats with efficient automation features and precise contextual analysis.

CISAnalysis – October 11, 2022

Fortinet Authentication Bypass Vulnerability

First up, CVE-2022-40684 affects multiple Fortinet products: FortiOS, FortiProxy, and FortiSwitchManager. The vulnerability, which was only recently discovered and disclosed last week, allows an attacker to execute code masquerading as an authorized user. With this device takeover, they can perform privileged operations, such as viewing files, changing permissions, and other confidential activities. So in this case we would likely see this as the start of a string of moves deeper into the victim’s network. Since switches connect devices across networks, this opens up the attack surface to an even greater degree. As is typical, vulnerabilities are exploited as the entryway in, so it is imperative to update the affected versions immediately.

Windows COM+ Event System Service Privilege Escalation Vulnerability

CISA did not waste any time adding an escalation of privilege vulnerability in Windows COM+ Event System Service to the KEV on the same day a patch was released.

Microsoft has rated the severity of CVE-2022-41033 as “Important” which is analogous to the High CVSS score it received. So although none of these organizations gave it a Critical rating, Microsoft’s update guide paints a different picture. The attack complexity is low and user interaction is not required, making this an easy vulnerability to exploit. The silver lining is that the attack vector is local, so they’ll need access to a regular user computer. But not all that glitters is gold, of course. The attacker will most likely reroute and target someone on the inside to exploit the vulnerability, e.g. tricking a legitimate user into opening a malicious document. So again, it will be crucial to remind employees (especially during National Cybersecurity Awareness Month) to stay vigilant and report any signs of phishing.  An attacker can gain SYSTEM privileges, so it is important to install the updates as soon as possible.

#cisa #cisanalysis #microsoft #fortinet #vulnerabilities

About Version 2 Digital

Version 2 Digital is one of the most dynamic IT companies in Asia. The company distributes a wide range of IT products across various areas including cyber security, cloud, data protection, end points, infrastructures, system monitoring, storage, networking, business productivity and communication products.

Through an extensive network of channels, point of sales, resellers, and partnership companies, Version 2 offers quality products and services which are highly acclaimed in the market. Its customers cover a wide spectrum which include Global 1000 enterprises, regional listed companies, different vertical industries, public utilities, Government, a vast number of successful SMEs, and consumers in various Asian cities.

About VRX
VRX is a consolidated vulnerability management platform that protects assets in real time. Its rich, integrated features efficiently pinpoint and remediate the largest risks to your cyber infrastructure. Resolve the most pressing threats with efficient automation features and precise contextual analysis.

Not So Fast: Analyzing the FastCompany Hack

When FastCompany’s website was hacked late Tuesday night, it sent shockwaves through the media world, underscoring the importance of routine cybersecurity inspections for media companies. Now, in the wake of the prominent hack, media companies are scrambling to secure their content management systems.

So, what happened and how?

Well, the hacker (who went by the name “postpixel”) managed to infiltrate FastCompany’s content management system (CMS) and post stories that looked like they were from FC’s editorial team. They also hijacked FastCompany’s Apple News feed (a first), broadcasting obscene push notifications replete with racial slurs and, uh, an “invitation for a particular sexual act,” according to The Verge.

In a statement, FastCompany responded with the following:

“The messages are vile and are not in line with the content and ethos of FastCompany. We are investigating the situation and have shut down FastCompany.com until the situation has been resolved.”

As of this writing, FastCompany.com was still offline.

Source: FastCompany

In a warning of sorts, the hacker also left a message to FastCompany’s readers, detailing their execution of the hack while criticizing FC’s feeble attempts at security remediation:

Source: FastCompany via The Verge

According to “postpixel,” they were able to gain access to FastCompany’s systems by exploiting an insecure password shared by an FC site administrator. They also claimed to have traded FC’s data in a forum for black-hat hackers, including sharing records on FastCompany employees, and even sharing unpublished FastCompany articles.

This may be headline news today, but this is just the latest hack in a string of cyberattacks on media companies. In recent months, both The New York Times and The Wall Street Journal have reported that their systems had been compromised by hackers. You can bet that there will soon be a new headline to replace FastCompany.

The bottom line: These incidents serve as a reminder that media companies need to take steps to secure their data and protect their employees.

Most of all…

Trust No One.

In the wake of high-profile hacks at major media companies like Fast Company, it’s clear that traditional approaches to cybersecurity are no longer enough. One of the most important things companies can do to protect themselves is to implement stronger internal security models.

The shocking conclusion tech and media companies are just now coming to terms with is that people are the weakest links in security. As a result, they’re taking a firm “trust no one” stance.

The security buzzword for this is “Zero Trust,” which simply assumes that a company can be breached no matter what, including by its own unwitting users. The un-named FastCompany “administrator,” for instance, who shared passwords inside the firm.

With zero trust, every user and every device is treated as a potential threat. This means that all traffic must be authenticated and authorized, regardless of where it’s coming from. What’s more, a core component in a proper zero-trust environment is behavioral analysis. In a nutshell, your software should monitor network behavior and flag suspicious activity. This makes it much harder for hackers to gain access to a company’s network, because they would need to have valid credentials each step of the way.

Zero trust also includes comprehensive vulnerability management. This means regularly scanning for vulnerabilities and patching them as soon as possible. Behind the scenes, I’d wager FastCompany is arguing over how to best implement new security measures and protect itself from future attacks.

But creating a new security architecture is no easy task, especially for a major media company. For FastCompany, it will likely involve completely gutting its current system and renovating it from top to bottom. That will require education and buy-in from FastCompany’s senior leadership, middle management, and even its freelancers.

We have some advice, if you’re listening, FastCompany…

So You’ve Been Pwned. What to Do Next.

Every journey begins with a single step. For FastCompany, one of the most important things it (and other media companies) can do is to regularly inspect their cybersecurity protocols and make sure they are up to date. This includes ensuring that passwords are strong and, ahem, not openly shared and/or reused across multiple accounts.

While it may seem like I’m picking on FastCompany, it’s just one example – this type of attack could happen to any media outlet. In order to protect themselves, media companies need to make sure they have a robust vulnerability management program in place.

Vulnerability management is all about identifying, prioritizing, and fixing security flaws within an organization’s systems. If a media company doesn’t have a good handle on its vulnerabilities, it’s leaving itself wide open to attack.

There are a few key things that all media companies should do to shore up their defenses:

  • Conduct regular security audits: By regularly assessing their systems for vulnerabilities, media companies can stay ahead of the curve and fix any problems before they’re exploited.
  • Keep software up to date: Relying on outdated software makes it easy for hackers to gain access to a company’s systems. Make sure all software is up to date. This way, media companies can close off this avenue of attack.
  • Educate employees: Hackers often exploit human error through social engineering to gain access to systems. By educating employees on security best practices, media companies can make it much harder for hackers to succeed, even if they’ve already breached their walls.
  • Implement strong security controls: FastCompany’s hack highlights the importance of having strong security controls in place. By implementing measures like two-factor authentication (2FA), media companies can make it much more difficult for hackers to gain access to their systems.
  • Plan for the worst: No matter how many safeguards a media company puts in place, there’s always a chance that they could be hacked. That’s why it’s important to have a plan in place for how to handle a breach if one does occur.

In today’s world, it’s not enough to simply have strong security measures in place. Organizations also need to be constantly monitoring their systems for vulnerabilities that could be exploited by hackers.

In the wake of the FastCompany hack, it’s also important for media companies to consider how they share information internally. In many cases, it may be necessary to restrict access to certain sensitive data or conversations to a smaller group of people.

By taking proactive measures to address vulnerabilities, media companies like FastCompany can dramatically reduce their chances of being hacked and safeguard their content from being hijacked by malicious actors.

#vicarius_blog #hacked #fast_company #cybersecurity

About Version 2 Digital

Version 2 Digital is one of the most dynamic IT companies in Asia. The company distributes a wide range of IT products across various areas including cyber security, cloud, data protection, end points, infrastructures, system monitoring, storage, networking, business productivity and communication products.

Through an extensive network of channels, point of sales, resellers, and partnership companies, Version 2 offers quality products and services which are highly acclaimed in the market. Its customers cover a wide spectrum which include Global 1000 enterprises, regional listed companies, different vertical industries, public utilities, Government, a vast number of successful SMEs, and consumers in various Asian cities.

About VRX
VRX is a consolidated vulnerability management platform that protects assets in real time. Its rich, integrated features efficiently pinpoint and remediate the largest risks to your cyber infrastructure. Resolve the most pressing threats with efficient automation features and precise contextual analysis.

How to test application with ZAP – Part Two

In the previous article – part one of this topic, I covered the basics of HTTPs requests you should know how to create/modify using OWASP’s ZAP. Also, I have covered how to set up a test environment with two virtual machines run by VMware Workstation. If you somehow ended up here and didn’t read the first part – How to test application with ZAP – Part One, please read it first and set up the environment!

I will start by explaining what ZAP is and what you can do by using it. 

What is ZAP?

ZAP stands for Zed Attack Proxy. This tool was developed by the OWASP community and is actively maintained by them. It is a free, open-source, so-called web app scanner. In general, it is a well-known application security testing (DAST) tool. The official site where you can download this tool can be found at this link. You can also find some tutorials on their site that will help you learn more about using this tool.

ZAP can be installed and used in Windows, Linux, or Mac OS. It can be also run in a Docker container.

This tool is used mainly for finding vulnerabilities in web applications, pentesting, etc. In this article, we will mainly use this tool for creating/modifying requests and sending them to the basic web application we will set up in Ubuntu. 

ZAP can scan and find vulnerabilities related to:

  • SQL injection
  • Broken Authentication
  • Sensitive data exposure
  • Broken Access control
  • Security misconfiguration
  • Cross-Site Scripting (XSS)
  • Insecure Deserialization
  • Components with known vulnerabilities
  • Headers with low-level security

Key features ZAP contains:

  • Active Scan
  • Passive Scan
  • OWASP ZAP Fuzzer
  • OWASP ZAP API
  • WebSocket Testing
  • JAX Spidering
  • Scan Policy Management
  • ZAP Marketplace

*Before installing ZAP, check if your system already has Java 8+ installed because that is the only requirement. I have already provided ZAP official site where you can download it, but you can also do it via terminal with the following command: sudo apt install -y zaproxy. Please run this command to install ZAP in your new Kali machine so we have it prepared for the third part of the series.

How are we going to test the application using ZAP in a real test environment?

As I mentioned, you first need to set up the test environment described in the previous part of this series. Then we will deploy the web application we create via Docker inside an Ubuntu machine. We will create the test application in Angular 13. And after that, we will make the connection between Kali and Ubuntu. From Kali, we will use ZAP to make requests and try to hit the running web application in Ubuntu.

How to create an Angular web application

I created an Angular application in Windows. First, you will need to download a code editor. For this guide, I used Visual Studio Code. You can find download it from its official site. Then you would need to install Node.js from their official site. Download the LTS version and install it.

From now on, we will use the Visual Studio Code terminal to issue the commands.

Using the terminal, we will first install Angular CLI with the following command:

npm install -g @angular/cli

Then you can check the version of the installed CLI:

ng version

You can also check if node js is installed properly by using this command:

npm -v

Now we will use Angular CLI to create a new app with this command:

ng new <application name>

Good, now we have the app, and we want to test if the installation was successful by running the application with this command – ng serve; You should see the application running on your localhost – port 4200 (http://localhost:4200). If that port is not used.

We want to prepare our application for deployment, so we need to configure a few additional things. First, we want to create a Dockerfile so we can deploy the app with Docker.

To do so, we are going to the application’s main folder and adding a new file, which we are naming “Dockerfile.”

Paste this code in the Dockerfile:

FROM node:16.14.0 as node
WORKDIR /app
COPY package.json /app/
RUN npm install
COPY ./ /app/
RUN npm run build --prod

FROM nginx:latest
COPY ./nginx.conf /etc/nginx/conf.d/default.conf
RUN rm -rf /usr/share/nginx/html/* 
# NOTE: Change this path according to your project's output folder, check in angular.json outputPath
COPY --from=node /app/dist/ /usr/share/nginx/html
EXPOSE 80

We will use Nginx to host the angular build inside the container. We will need to create another file in the main folder and name it “nginx.conf”. Copy this code to the file:

server {
  listen 80;
  sendfile on;
  default_type application/octet-stream;
  gzip on;
  gzip_http_version 1.1;
  gzip_disable      "MSIE [1-6]\.";
  gzip_min_length   256;
  gzip_vary         on;
  gzip_proxied      expired no-cache no-store private auth;
  gzip_types        text/plain text/css application/json application/javascript application/x-javascript text/xml application/xml application/xml+rss text/javascript;
  gzip_comp_level   9;
  root /usr/share/nginx/html;
  location / {
    try_files $uri $uri/ /index.html =404;
  }
}

Now you need to build the application, so the dist folder gets created. You can do that with the command – ng build.

When you have created the application, you can copy it to your Ubuntu VM. I used GitHub and just cloned the repo to my Ubuntu Server.

How to deploy the Angular application

First, run both VMs in VMware – Ubuntu and Kali, so you can be ready for the next steps. 

To deploy the application, we will use Docker. For me, it is one of the easiest ways for deployment. 

First, we will need to download and install Docker. We will download Docker, where we want to deploy the Angular application, which would be on our Ubuntu machine. 

The easiest way to install Docker in Ubuntu would be to do it through Kali machine, which you used to SSH inside the Ubuntu Server; I did this because Ubuntu Server is quite frugal, and Kali lets me paste the commands easily, has coloring for the commands, etc. 

In Kali terminal type command:

ssh user_name@ubuntu_ip_adress , in my case it would be:

ssh jenny@192.168.221.129

Now you will be asked for the password of the Ubuntu VM. Type it in – or use key authentication if that’s easier for you – you should now be inside your Ubuntu machine. We are now going to install Docker and create our container on the Ubuntu Server.

We will download Docker to Ubuntu with the following commands:

curl -fsSL https://download.docker.com/linux/ubuntu/gpg | sudo gpg --dearmor -o /etc/apt/keyrings/docker.gpg
echo \
"deb [arch=$(dpkg --print-architecture) signed-by=/etc/apt/keyrings/docker.gpg] https://download.docker.com/linux/ubuntu \
$(lsb_release -cs) stable" | sudo tee /etc/apt/sources.list.d/docker.list > /dev/null
sudo apt update
sudo apt-get install docker-ce docker-ce-cli containerd.io docker-compose-plugin

Now we have installed Docker. We can check that by running a basic command to list all containers. In our case, because we didn’t create and run any container yet, we will have an empty list. Command is:

sudo docker ps

Now we are finally at the step of deploying our web application via Docker.

We want to change the directory (cd <folder_name>) to the web application project folder and run the following commands while inside that directory:

sudo docker build -t testzap:v1.0.0 -f ./Dockerfile .
sudo docker run -p 80:80 -d testzap:v1.0.0

Then test using 

sudo docker ps

We can check the list of running containers with this command: 

sudo docker container ls

Great, our application now runs on port 80.

Setup ZAP to use in the browser

We will use Kali as an attacker machine, so we will send requests from it to our victim/target machine – Ubuntu.

You probably already installed ZAP, but if you didn’t, check out the What is ZAP section. 

Run ZAP. This window will pop up:

We can select no, and if we want to save the session, we can do it at a later time.

If you choose to save the session, it will be saved to the disk in an HSQLDB database. The database gets a default location and name. You can access the db later. If you don’t persist a session, the files are deleted once you exit ZAP.

Then you will see the list of Add-ons. Click on Update all.

I like to use the Brave browser, so you can also check it out and download it on this site

How to use ZAP in Brave?

We will need to install a proxy extension called proxyswitchyomega. Search it in Brave and install it.

It is a good practice to create separate profiles in the browser, which we are going to use only for our security testing. 

We would also like to configure proxyswitchyomega. We are going to click on it in the browser and go to the Settings section Profiles –> Proxy and change localhost in field proxyserver/servers. And here, we can also rename the server (ZAP) and click on Apply.

Great, ZAP in Browser is set up. 

Go to the browser, click on the ProxySwitchyOmega button, and click on ZAP (or how you named your proxy). Then navigate to the http://<Ubuntu_IP>:80, and our new application will appear. In my case, its 192.168.221.129:80.

Also, within the ZAP interface, inside the tree on the left-hand side under sites, you will see that the URL of the application will appear. In my case, under sites, ZAP is showing the domain name (http://**-server); this is because I have previously set that up on Kali. The IP address resolved to that name is the one from above – 192.168.221.129 – which is my Angular app. 

Finally, we can now start investigating our application via ZAP!

In the next chapter, I will show you how to investigate the application!

Conclusion

In this second part of the testing with ZAP series, I tried to explain what the ZAP tool is used for, how to create an Angular web app, deploy it using Docker and send the request with ZAP.

You are now fully equipped to start with security testing. You can also use other security tools with this test environment setup if you wish (for example, Burp Suite).

Interesting links related to the ZAP topic:

#ZAP #Angular14 #Brave #Docker #Kali #Ubuntu

Cover photo by Markus Winkler

About Version 2 Digital

Version 2 Digital is one of the most dynamic IT companies in Asia. The company distributes a wide range of IT products across various areas including cyber security, cloud, data protection, end points, infrastructures, system monitoring, storage, networking, business productivity and communication products.

Through an extensive network of channels, point of sales, resellers, and partnership companies, Version 2 offers quality products and services which are highly acclaimed in the market. Its customers cover a wide spectrum which include Global 1000 enterprises, regional listed companies, different vertical industries, public utilities, Government, a vast number of successful SMEs, and consumers in various Asian cities.

About VRX
VRX is a consolidated vulnerability management platform that protects assets in real time. Its rich, integrated features efficiently pinpoint and remediate the largest risks to your cyber infrastructure. Resolve the most pressing threats with efficient automation features and precise contextual analysis.

×

Hello!

Click one of our contacts below to chat on WhatsApp

×