Skip to content

Azure AD Best Practices

Identity is the new perimeter. Cyberattacks are becoming more advanced and cloud-focused. Identity providers (IdP) have responded by offering security controls that make it possible for small and medium-sized enterprises (SMEs) to be proactive and mitigate these threats. Many SMEs use Microsoft’s Azure Active Directory (AAD), which has prescribed best practices to secure identities. Microsoft reserves several features for its most premium subscriptions levels. IT administrators must determine which subscription tiers, or mixture of supplemental services from an open directory, are most appropriate for their unique security requirements. 

This article outlines the fundamentals of securing identities in AAD with emphasis on understanding what options are available and tailoring security controls to your organization. Provisioning and identity and access management (IAM) is the starting point, followed by centralizing the identity management lifecycle, adding appropriate controls, and auditing.

Identity and Access Control

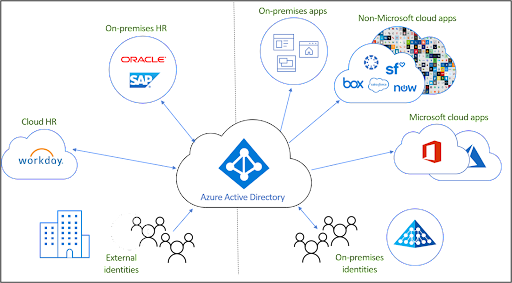
There are three main paths for provisioning in AAD: 

  • HR-driven onboarding.
  • Federating identity from AAD to cloud apps.
  • Inter-directory such as between the Active Directory Domain Services (AD DS) server role to access resources from your on-prem Active Directory domains.
Image credit: Microsoft

Provision, Manage, and Deprovision Access 

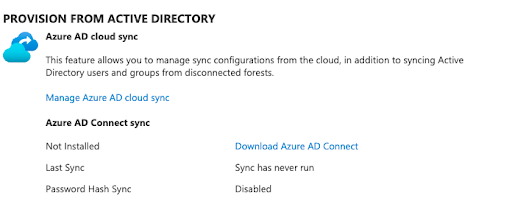
Most Microsoft shops have Active Directory (AD). A sync tool called Azure AD Connect syncs users with AAD. Microsoft also accepts non-Microsoft identities for access control, but additional costs may be assessed. Some organizations may have deployed Active Directory Federation Services (AD FS) prior to the advent of AAD. 

There’s a significant potential for disruptions to system availability when identities are migrated from AD FS to AAD without deliberate planning. Avoid impulsive decision-making when you’re migrating users. Organizations that opt for a hybrid approach should harden Active Directory. This detailed guide offers recommendations about how AD should be managed and maintained for optimal security. Always limit administrative privileges in AD and avoid running day-to-day as a domain administrator.

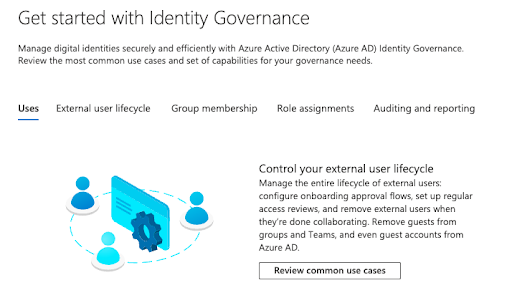
Familiarize yourself with “join, move, and leave” planning processes and Microsoft’s concepts for identity governance. Automation is possible, but it’s designed for mid-size to large organizations. There’s no default auditing to avoid over-provisioning users or for when individuals leave. Due diligence is necessary to avoid security and compliance issues.

Critically Important AAD Best Practices

Verify that you’ve completed these steps before moving on.

Role-Based Access Control

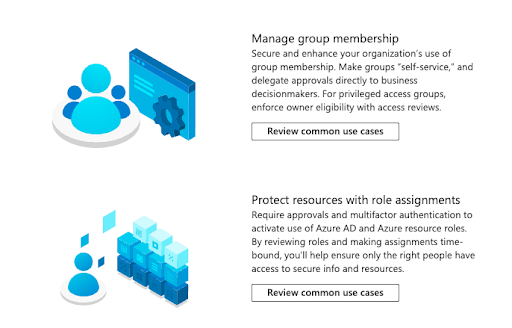
AAD has built-in and custom user roles, and role-based access control (RBAC) is standard across all subscription tiers. This permits IT to follow the concept of least privilege and helps to establish a Zero Trust security approach, but it relies heavily on manual input and maintenance.

Ensure that you:

  • Minimize the number of privileged accounts.
    • Plan to manage, control, and monitor access.
    • Limit global administrator accounts and make use of other roles such as billing administrator, global reader, helpdesk administrator, and license administrator.
  • Limit global administrators and never sync high privilege accounts from AD.
  • Pay careful attention to external collaboration settings and consider restricting external users from being able to invite guests to shared files; third-party storage; as well as review and adjust global sharing settings for SharePoint Online and OneDrive. These changes impact end users, but make it easier to recognize the “official” channels.

Using security groups for users assists with application security and lowers administrative overhead. Microsoft limits this capability to AAD Premium 1 (P1) and Premium 2 (P2) accounts. However, always try to avoid assigning resources directly to users and use identity protection. Please note that Microsoft has documented multiple limitations to syncing AD groups with ADD groups.  For example, AD primary group memberships will not sync over to AAD.

Multi-Factor Authentication

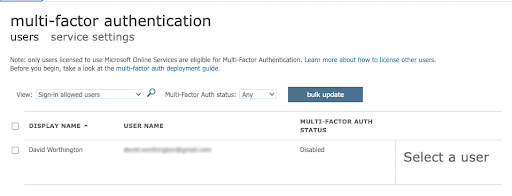
Multi-factor authentication (MFA) is vital for identity protection. AAD’s free tier only permits the use of the Microsoft Authenticator application. Admins have the option of only protecting the Azure AD Global Administrator versus all accounts, but it’s highly advisable to set up MFA for all users. Protect against MFA self-enrollment attacks by using a Temporary Access Pass (TAP) to secure the initial registration. Avoid mixing per-user MFA with Security Defaults and other settings.

Your budget may impact what’s possible. Microsoft assesses fees for all MFA verifications that happen with non-Microsoft identities and capabilities vary depending upon licensing levels

Consider using additional context and “number matching” in Authenticator notifications to include the application name and geographic location in Push MFA prompts. This practice safeguards against “MFA bombing,” where attackers send repeated requests to exploit MFA fatigue. Attackers successfully hijacked Microsoft users’ sign-in sessions to bypass MFA at 10,000 organizations by using advanced phishing toolkits. Microsoft’s mitigation is to use certificate-based authentication and Fast ID Online (FIDO) v2.0 MFA implementations. 

MFA through FIDO 2 devices and Windows Hello requires AAD P1 and P2. Additional hardware costs may apply. Some additional security controls include conditional access (CA).

Conditional Access

Microsoft recommends that all accounts deploy CA, but it’s also an extra cost and only available through P1, P2, or the E3 and E5 tiers for Microsoft 365 (M365) users. The standard M365 tier doesn’t include it. The overall licensing scheme is changing and can be bewildering. 

There’s more than one CA implementation:

  • P1 enforces MFA in certain scenarios
  • P2 is risk based, learning user behavior to minimize MFA prompts

There are additional steps to consider for password management before we move on.

Configure Password Management

Microsoft has revised its password policy guidance to no longer expire passwords. It’s important to understand that SMEs that are regulated or don’t have MFA and CA configured shouldn’t do that. You may also consider changing passwords if you suspect an ID has been hijacked. CrowdStrike found that 71% of attacks are now malware-less and targeting cloud IDs. 75% of cloud breaches are due to compromised identities. A Zero Trust posture isn’t optional. Consider deploying Extended Detection and Response (XDR) from a vendor of your choosing or paying extra for Microsoft Identity Protection if you prefer the Microsoft stack.

Other best practices are:

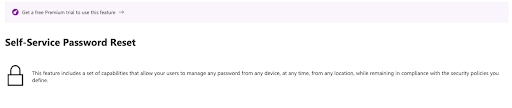
  • Set up self-service password reset (SSPR) with two authentication methods. Note that using security questions might be risky, because attackers gather intelligence on employees that’s “open source” from the web or obtain information from third-party breaches elsewhere. Microsoft charges extra for on-premises write-back.
  • Use the same password policies everywhere (on-prem and cloud-based). Microsoft maintains extensive documentation on an agent-based approach to enforce AAD password protection on AD DS without exposing your domain controller to the web or forcing networking changes. Note that you have to be proficient in modifying AD settings.

Prepare for the Worst

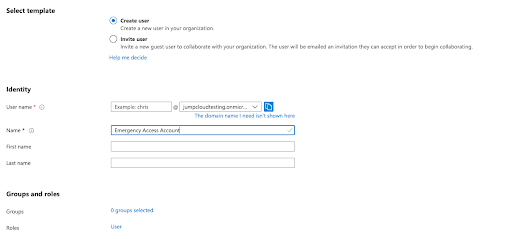
Create an emergency access Global Admin account for when it’s necessary to “break the glass” during network outages and periods of system downtime. This account is excluded from CA and MFA. Always store these credentials appropriately and use a highly complex password.

Following the steps outlined above provides a strong foundation with the appropriate entitlements, attributes, and processes to prepare AAD for application provisioning.

Manage Connected Applications

Application provisioning is on a per user basis by default with group assignment to applications being reserved for P1, P2, or equivalent AAD subscribers. Ensure that applications don’t provision high access through RBAC. There are multiple options, and automation is available for application provisioning. The initial provisioning cycle populates users, followed by programmatic incremental updates that handle updates made through Microsoft Graph or AD.

Microsoft provides several options for attribute mapping from identities that originate from the “three paths” mentioned above via SCIM endpoints to cloud resources or the Azure AD Provisioning agent. The latter must run on the same server as your SCIM application. Microsoft also has options for one-way connections from AAD to LDAP or SQL database user stores, but those have several on-premise prerequisites. Provisioning users into AD DS isn’t supported.

Siloed identities complicate existing identity practices and infrastructure as well as increase technical overhead and the attack surface area. Enable single sign-on (SSO) to centralize identity management either through AAD or a system or service that integrates with it. 

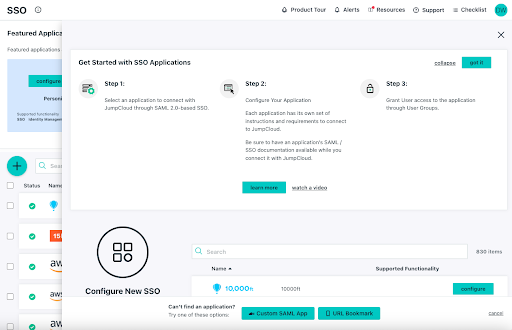
Enable Single Sign-On

SSO will improve security through modern authentication protocols, make life easier for your users, and reduce management overhead. Microsoft has imposed restrictions on the number of SSO applications per user on its free tier, but that policy may be changing. AAD provides pre-built integrations through the Azure AD application gallery in addition to SAML and OAuth 2.0 SSO protocols for manual settings. Microsoft doesn’t support the AAA protocol RADIUS, which many network appliances use for access control, so its SSO doesn’t access all of your resources. Consider using cloud RADIUS or install and configure the Microsoft NPS server role.

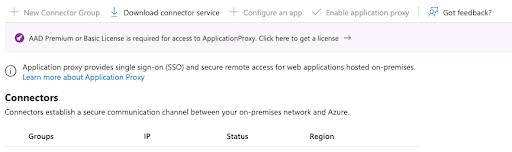
It’s possible for all AAD tiers to access native Windows apps via Kerberos, NTLM, LDAP, RDP, and SSH authentication in a hybrid deployment. However, identity protection features such as CA are limited to P1 and P2 products including Azure AD Application Proxy or secure hybrid partnerships integrations. These services will extend modern security to legacy apps.

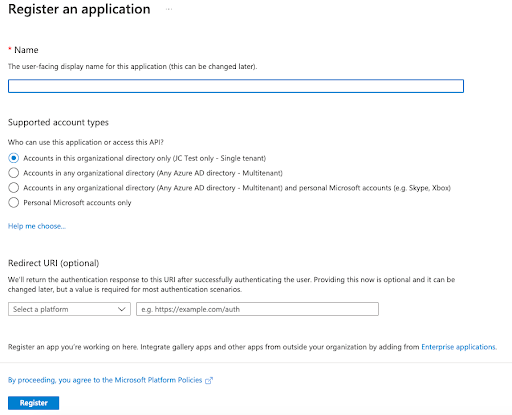
Phishing Considerations

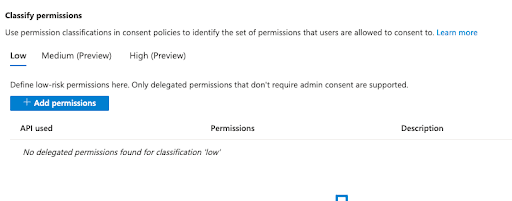
Microsoft’s default settings permit all users to access the AAD admin portal and register custom SSO applets. Attackers are wise to this workflow and exploit OAuth in phishing exploits, which may bypass MFA. The principle of least privilege mandates that users who don’t need access shouldn’t receive it. Strongly consider restricting user-driven application consent and setting permissions classifications to “low impact.” This also applies to group owners. Compliance boundaries are murkier and should be carefully assessed outside of the Microsoft ecosystem.

AAD can be complex and Microsoft has amassed Azure partners for advanced specialization. Blocks of time with consultants should be a budgeting consideration for any AAD project. This writer, a former IT director, needed consultants even when projects appeared straightforward.

AAD is capable of alerting you to suspicious OAuth authorization requests, but that requires an additional subscription to Microsoft Cloud App security, either standalone or through M365 E5. Other solutions such as CrowdStrike Falcon Identity Protection have this capability. JumpCloud is a CrowdStrike partner and integrates with its solutions through the CrowdStrike Store.

Now that you’re familiar with configuring users, groups, and applications, let’s review reporting. 

Audit Your Security Regularly

You should always look for ways to improve in-house security and processes. If you can’t stop it, you should at least monitor it. Regularly audit your entitlements, users, and review activity reports. Taking this extra step helps make security a process as opposed to relying solely on products and services. 

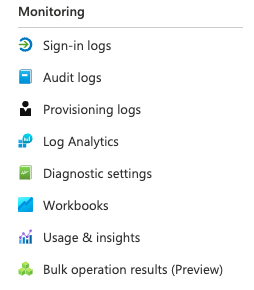
Ideally, you’ll be monitoring all privilege changes, suspicious activity, and signs of known attacks. AAD will provide you with several reports:

  • Basic security and usage reports are included among all subscription tiers
  • Advanced reporting is restricted to P1 and P2
  • SIEM reporting and Identity Protection require P2 (or equivalent) subscriptions

Some security capabilities may be more accessible and easier to deploy via JumpCloud, which integrates with AD, AAD/M365, Google Workspace, and Okta, or can function as a standalone directory. JumpCloud is focused on managing identities, in all places, as your security perimeter.

How JumpCloud Improves Upon Azure AD Best Practices

JumpCloud is an open directory platform that manages identities, access control, and devices. Devices are a method of granting access to an identity or application, so device management is included by default. That makes it possible to assemble high visibility telemetry data for reporting.

As previously noted, Microsoft requires its users to purchase additional subscriptions (Entra, M365 E3/5, AAD P1/2, and Intune for device management) to meet its recommendations for best practices. Standard AAD deployments fall short of Microsoft’s guidance, but some of its premium offerings may sell SMEs more features than they require or even want to purchase.

JumpCloud can help to fill in some of those gaps, and is easy to deploy, with deepening integrations for exporting AAD user groups. It’s designed for SMEs, so IT teams may benefit from having more control over what they’re buying (as opposed to not using what they pay for). The next section explores the specifics of how JumpCloud can improve AAD and help your organization to build the stack of its choosing out of best-of-breed apps and services.

IAM and SSO

Identities flow into JumpCloud from other directories, HRIS systems, or JumpCloud’s Cloud LDAP. Attributes, such as where users are located, who their supervisor is, or what team they belong to, simplify provisioning user access to IT resources such as applications and networks. 

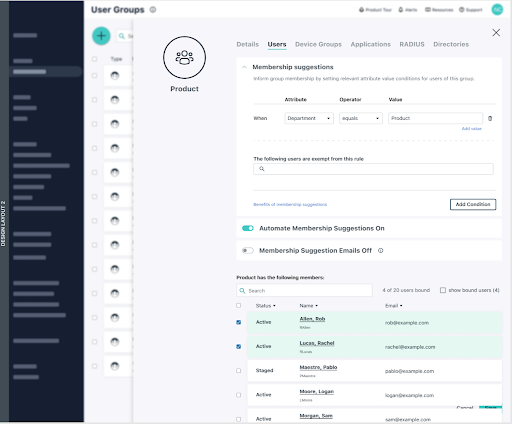
Group management is provided at no additional cost and leverages attribute-based access control (ABAC), enabling the system to continuously audit entitlements for Zero Trust access control. JumpCloud is introducing the ability to automate and apply membership suggestions to groups. RBAC is more of a manual process, which can lead to mistakes that over or under provision users. Group members can access resources through SSO protocols and more:

  • SAML
  • OAuth 2.0
  • OIDC
  • RADIUS
  • LDAP

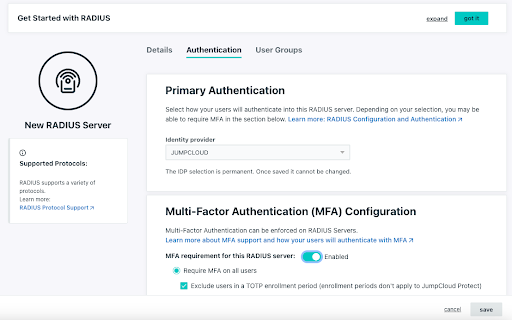
JumpCloud provides delegated authentication that leverages AAD credentials and password policies for RADIUS. This capability extends Azure SSO to network resources such as Wi-Fi networks and VPNs while also reducing technical overhead and eliminating siloed identities. SSO applets launch from within the JumpCloud user console as a security control for phishing.

Environment-Wide MFA

JumpCloud Protect™, an integrated authenticator app for MFA, is designed to be frictionless. It provides application-based Push MFA and TOTP in addition to WebAuthn and U2F keys. More options for biometric authentication and passwordless log-in experiences are being added to the platform. 

MFA can be configured for most SSO, LDAP, and RADIUS logins. It’s also integrated with CA.

Conditional Access

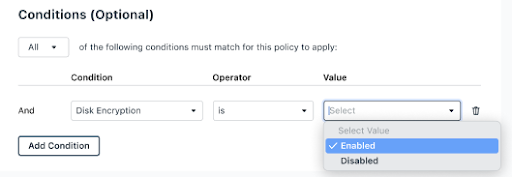
AAD identities can be protected by conditional access through JumpCloud as an add-on without purchasing P1 or P2 from Microsoft. Pre-built rules are available to enforce MFA for privileged user groups, restrict logins to specific locations, and to require device trust. Meaning, any identity + device that isn’t managed by JumpCloud won’t be able to access cloud apps. More granular conditions such as OS version and device encryption status are coming soon.

Password Management

A decentralized password manager and vault is available as an add-on through browser plug-ins and mobile apps to help SMEs implement complex passphrases for users. This feature assists with provisioning and revoking user access to reduce the risk of data breaches. Centralized password management also increases visibility for compliance peace of mind.

Device Management

JumpCloud is cross-OS, supporting:

  • Android: Support for policies and application distribution is coming in late 2022 and beyond.
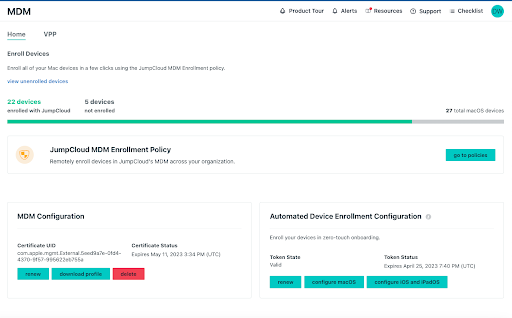
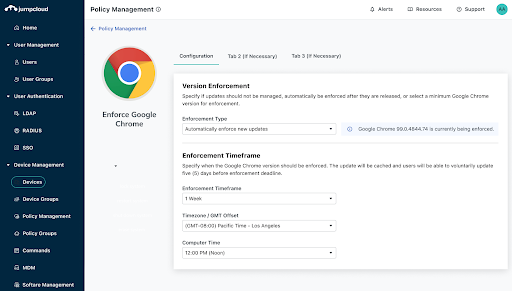
  • Apple products: Mobile Device Management (MDM) is available for macOS and iOS devices, providing for application distribution, policies, and commands with the option for Zero Trust deployment. Policies are timely and in-touch with the needs of Mac admins, including addressing “Day 0” OS upgrade controls. 
  • Linux: JumpCloud supports multiple Linux distros with multiple deployment options. It provides pre-built policies, including full disk encryption (FDE), and Sudo access for commands (with pre-built security commands through the Admin Console). IAM capabilities aren’t restricted to certain browsers; Microsoft mandates Edge for Intune device enrollment. Intune is an additional subscription beyond standalone AAD. 
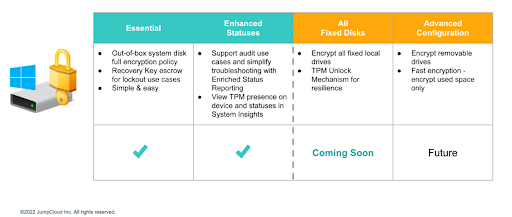
  • Windows: Anything an admin wishes to do is possible through security commands and a PowerShell module. Commands function through a queue. JumpCloud providespre-built GPO-like policies including fine-grained control over BitLocker, as well as a GUI for custom policies. There’s also software distribution, and more, with Windows Out of Box Experience (OOBE) coming soon to streamline onboarding remote workers.

Patch Management

JumpCloud offers cross-OS patching as an add-on. Patching is an important activity to mitigate the risk of security breaches that leverage 0-Day attacks with a healthy device state. Centralizing patch management helps to reduce costs versus purchasing a third-party patch management solution for Windows and all other operating systems. Browser patch management is arriving in Q4, 2022, and it will extend to reporting for management status.
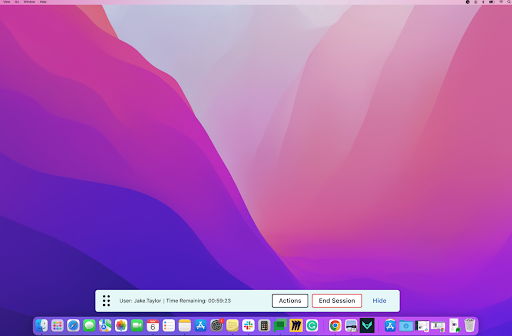
Remote Assist

IT teams can extend opt-in remote support to users with Remote Assist. It’s free and works cross-OS. The only configuration that’s required is to have JumpCloud agents running on a device that’s bound to an identity from the open directory. It’s possible to:

  • Copy and paste between devices
  • Work in multi-monitor systems
  • Turn on audit logging
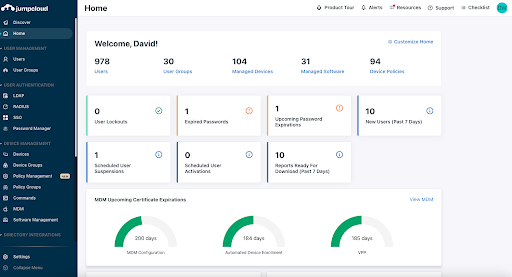
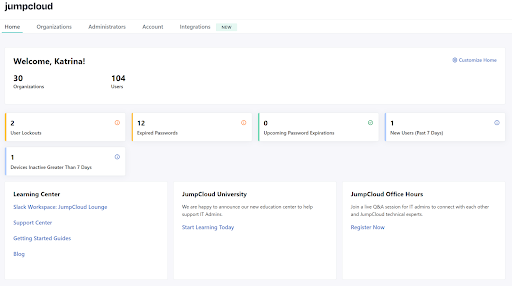
Reporting

JumpCloud’s emphasis on making identity the new perimeter is reflected in the telemetry that’s available from built-in reporting tools including Device Insights and Directory Insights. There’s a growing selection of pre-made reports, stored for analysis. SIEM integration is also possible.

Some of those include:

  • User to Devices
  • User to RADIUS Server
  • User to LDAP
  • User to Directories
  • User to SSO Applications
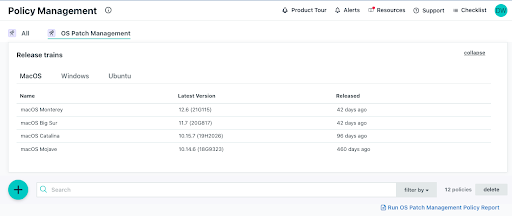
  • OS Patch Management Policy

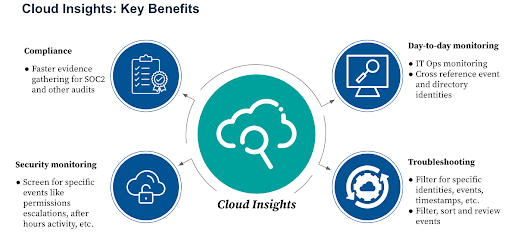
Cloud Insights is an add-on to monitor Amazon Web Services (AWS) events and user actions. This makes compliance and data forensics easier for SMEs and helps to enforce least privilege in cloud infrastructure. Support for Google Cloud (GCP) will be introduced next for a multi-cloud strategy.

Avoid Vendor Lock-In and Do More with JumpCloud

JumpCloud is available to try with full functionality for 10 users and devices, and with 10 days of complementary chat support before charges are accessed. AAD users benefit from more freedom of choice, simpler deployment workflows, access to more sources, and lower costs.

Sometimes self-service doesn’t get you everything you need. If that’s how you’re feeling, schedule a 30-minute consultation to discuss options for implementation assistance, migration services, custom scripting, and more.

Similarly, managed service providers (MSPs) receive 10 free user accounts within the first organization that they create in the multi-tenant portal, JumpCloud’s dedicated MSP solution.

About Version 2 Digital

Version 2 Digital is one of the most dynamic IT companies in Asia. The company distributes a wide range of IT products across various areas including cyber security, cloud, data protection, end points, infrastructures, system monitoring, storage, networking, business productivity and communication products.

Through an extensive network of channels, point of sales, resellers, and partnership companies, Version 2 offers quality products and services which are highly acclaimed in the market. Its customers cover a wide spectrum which include Global 1000 enterprises, regional listed companies, different vertical industries, public utilities, Government, a vast number of successful SMEs, and consumers in various Asian cities.

About JumpCloud
At JumpCloud, our mission is to build a world-class cloud directory. Not just the evolution of Active Directory to the cloud, but a reinvention of how modern IT teams get work done. The JumpCloud Directory Platform is a directory for your users, their IT resources, your fleet of devices, and the secure connections between them with full control, security, and visibility.

Privacy and Anonymity – Public Hotspots

Intro

With my newly started series about the Dark web (which will still continue) I had an idea about how I could ‘branch out’ for a bit, as there are some convergent things here that are of interest to us. The shared aspect of someone’s activity on the Dark web and your daily usage of your favorite internet browser does indeed boil down to two things – privacy and anonymity.

I want to expand a bit on that, and I will try to look at it from a few different angles, but for this article I want to talk about the usage of Public Wi-Fi for privacy, and anonymity.

Public Hotspots

When you’re on a public hotspot keep in mind that the owner of that hotspot is in fact Man in The Middle. This means that they can see your traffic, inject into your traffic, other users on the network can as well look at your traffic, attack you, even directly through your open ports. Also, this hotspot doesn’t need to be the hotspot you think you’re connecting to.

That’s a lot of different risks coming at you all at once. But how would you go on about dealing with this? And I don’t mean not using the hotspot; let’s say that for some reason we must use that risky public hotspot.

One good thing to do (as a best practice of sorts) is to disable whatever wireless technology you’re not using, for example, Bluetooth, 3G, etc. It will also save some battery. If you must, try using a hotspot that has WPA2, AES, and avoid any hotspot that’s using WEP, for example. Just run from those.

Also, use SSL and TLS for encryption because without end-to-end encryption a threat actor might inject packets and attack you or your browser. Generally, for anything that’s sent from your device, use encryption. This is somewhere where your VPN might jump in.

The idea here is that the whole OS you’re on is sending data that’s encrypted, because you don’t want some stuff that’s in the background not to go through the encrypted tunnel messing your whole operation up.

One other good thing to do is set up a firewall profile for public hotspots/networks.

Lastly, you can bring hardware into the mix by using a portable router/firewall and connect it to the hotspot. The above ideas are the same as for the hardware, to add a layer of security to your connection, and hardware achieves that through physical separation. Of course, this might not be the best option for you, but in that case, at least try to stick with the bare minimum setup, and use a VPN, close those ports and services you won’t be needing don’t make it easier for your friendly neighbourhood hacker to compromise you.

On the flip side, public networks/hotspots, like internet café’s, airports, hotels, etc, are a good way to protect your anonymity; given, if you set up correctly, and if those networks provide anonymous connection.

Since this internet connection isn’t registered to you, nor should have any connections to you, it is a good way to keep your anonymity.

The things you should do when you’re going to visit one of these public places to access Internet anonymously


This whole scenario (somewhat) implies that your adversary has significant resources, and the consequences would be dire for you. Even if that’s not the case, in my opinion, you can’t really overdo this stuff, as you can never be truly 100% risk-free and/or secure which is why this has a place on the discussion panel – in my opinion.

I am very interested in this topic, and for me this is all for educational purposes. Please be careful, know the risks, as well as your limitations, and please don’t do any illegal activity! I don’t want to bore you, nor to digress any more, but I feel the need to say this out loud, just in case.

You will also want to follow your OpSec rules (this is something I covered previously, but as a refresher I will add the list below too – slightly variated)

  • Don’t talk openly about stuff that’s important i.e., mission critical

  • Don’t trust anyone

  • Don’t contaminate your identities

  • Be paranoid (better now, than later)

  • Stay under the radar – if you’re a dissident, don’t tweet your political opinions, etc. – make yourself ordinary as you can

  • Avoid logging whatever you can; if you can – destroy it. It’s better to not have it than to keep it encrypted, no matter the algorithm keeping your stuff secure…

  • Everything should be encrypted, even non-sensitive data

  • Treat your OpSec as a very serious thing, as it is.

To get back on our topic, ideally, you will have no pattern when visiting said public places where you will be accessing the Internet. You will vary your distance, you will choose those places at random, you will look for the busier ones, where more users go through, if possible, also vary the times you visit the said public places. Also, don’t bring a phone that can be tied to your identity that you don’t want to be associated with your internet connection, as it will be.

Try to fit in, avoid talking too much, and avoid standing out. Try to sit where you can see everything, ideally keep your back to a wall. You want to see everything/everyone coming at you so you can theoretically react in time.

For an extra-paranoid option, wipe the prints from the table, glasses, whatnot, basically don’t leave your DNA.

Also, remember – if you don’t own the machine you’re on – you’re fully vulnerable if you’re using your own accounts or stuff like that! (In case of the Internet café’s where you use their computers, as everything can be logged). There are mitigations for this (like pre-encrypting your stuff before using the public PC for that), but I would advise you to just not opt for going this route. Just avoid this option like the plague, if at all possible.

Summary/conclusions/musings

Another thing to note is that you can access hotspots from a distance, and I intend to expand on that a bit more, but don’t mistake public hotspots for anonymizing services. You should still send your traffic through an encrypted tunnel and follow all the OpSec rules that are relevant for your own threat model.

Conclusion


This has been a short intro on public hotspots and how to behave when you’re out there in the wild and you care about your privacy, security, and anonymity. I will expand on this for quite a bit, as I intend to cover the above mentioned accessing of the hotspots from a distance, as well as many other tips and tricks you might find useful on your privacy, security, and anonymity journey.

Stay tuned.

Cover image by Parker Coffman

#privacy #anonymity #public-hotspots

About Version 2 Digital

Version 2 Digital is one of the most dynamic IT companies in Asia. The company distributes a wide range of IT products across various areas including cyber security, cloud, data protection, end points, infrastructures, system monitoring, storage, networking, business productivity and communication products.

Through an extensive network of channels, point of sales, resellers, and partnership companies, Version 2 offers quality products and services which are highly acclaimed in the market. Its customers cover a wide spectrum which include Global 1000 enterprises, regional listed companies, different vertical industries, public utilities, Government, a vast number of successful SMEs, and consumers in various Asian cities.

About VRX
VRX is a consolidated vulnerability management platform that protects assets in real time. Its rich, integrated features efficiently pinpoint and remediate the largest risks to your cyber infrastructure. Resolve the most pressing threats with efficient automation features and precise contextual analysis.

Research: Exploiting Jsonpickle to Get RCE

Introduction

Jsonpickle is a python library which is widely used to serialize and deserialize python objects. Serialization is very useful to save state for an object and reconstruct the object from that state.

In this post, we will exploit the latest jsonpickle library to get remote command execution. 

Installation

Jsonpickle is available on the Python Package Index (PyPI), a repository hosting over 10TB of packages that programmers use to build their applications. We install the library with the command, pip3 install jsonpickle.

Setting Up Jsonpickle

For the scope of this article, we will focus on only two functions from the jsonpickle library: encode and decode.

First, we define a class named “zoo” and create an object for it.

Figure 1: Creating a class and an object for it

Now if we want to save the state of the object, we can encode the object with jsonpickle and print the byte stream, which can be used later to reconstruct the object with its state included.

Figure 2: Encoding the object with jsonpickle

Conversely, we can reconstruct the object with a decode function.

Figure 3: Decoding the object with jsonpickle

Attack Scenario

Now that we’ve demonstrated the two functions and how they work, we are ready to move forward with the attack.

Since we are attacking the jsonpickle library, we create a sample web application with jsonpickle to attack.

Our simple web application takes the base64 encoded serialized data and then decodes the base64 to jsonpickle object. And finally convert the jsonpickle object to actual object

Figure 4: Demonstrating encoding and decoding jsonpickle object

So, when we run the application with flask run, we can pass our data to http://127.0.0.1:5000/data?serialized= to interact with jsonpickle library

Creating the Exploit

So, we create a class RCE with member function reduce which will execute our payload.

After creating the object, we need to serialize the object and encode it with base64 so it can be passed to our web application.

Figure 5: Creating RCE and a serialized object

Now we copy the base64 payload and pass it to our web application, and we see that the command execution is successful and we have compromised the application.

Figure 6: Compromised application from base64 payload

Key Takeaway

The vulnerability is in the latest version of the jsonpickle library. As there are no fixes available, use of this library should be avoided. If the need to use jsonpickle still arises, ensure that jsonpickle does not handle unprocessed user data.

#jsonpickle #python #exploit

About Version 2 Digital

Version 2 Digital is one of the most dynamic IT companies in Asia. The company distributes a wide range of IT products across various areas including cyber security, cloud, data protection, end points, infrastructures, system monitoring, storage, networking, business productivity and communication products.

Through an extensive network of channels, point of sales, resellers, and partnership companies, Version 2 offers quality products and services which are highly acclaimed in the market. Its customers cover a wide spectrum which include Global 1000 enterprises, regional listed companies, different vertical industries, public utilities, Government, a vast number of successful SMEs, and consumers in various Asian cities.

About VRX
VRX is a consolidated vulnerability management platform that protects assets in real time. Its rich, integrated features efficiently pinpoint and remediate the largest risks to your cyber infrastructure. Resolve the most pressing threats with efficient automation features and precise contextual analysis.

Error Handling

I decided to focus this article on Error handling because it is a very common security problem if it is not handled properly. This topic is very tightly coupled with logging, but for this article, I will just cover error handling.

I saw on many websites that error messages presented to the user (in this case, me) need to be handled properly so they don’t reveal implementation details. You are familiar with the fact that hackers will look deeply into these messages because they know that if they contain information that should not be revealed, they could help them and be like little clues made out of exploitable pieces. 

The most common errors I have seen were detailed internal error messages which are displayed for the user, even sometimes as toast messages.


Why are internal errors presented to the users? 

The first problem is always the lack of documentation for the web application. By that, I mean that often due to the time deadlines when setting up the architecture creating the documentation ends up being somewhat neglected. 

Also, logging is often implemented as the last step when setting up the architecture or even after some basic functional code is written. And then, with the lack of documentation about error handling, developers often try to follow the steps of the error handling code they find in the application without any consistent guidance. And in the end, you get messy code, poorly implemented error handling, and exposed data that should not be revealed!

Where should errors be handled in the web application?


First, in the mentioned documentation for the web application. There should be defined a policy that will define which types of errors should be handled, what messages should be presented to the user, and what information should be logged.

You can choose where you should handle the errors. It would be eighter on the server side, on the client side, or even both. 

*In my practice, I handled the server errors in the API and sent the proper user message to the client side to be presented to the user if needed. I created a custom error handler for the client errors and presented user-friendly error messages again.

Tips for the error messages style on the client side

In this list, I will focus just on the error messages style, which will be presented for the user eighter they are created on the client side or the server side and sent to the client side.

  • Error and warning messages should be short and use clear and simple language (don’t use technical language). They should provide a short explanation why the problem is occurring and how to fix it (if it is feasible). In short- give direction to the user.

  • Error message images should be applied differently for different scenarios broken, not found, construction, access rights, and other errors.

  • By broken I mean when the Error is 500 when you can not launch some content or load it. Not found I mean when you get 400 error, or the page is not loading. By construction when it is planned site maintenance or some sync of the data. When other errors occur such as some action is not completed successfully you can implement basic toast message with red color. You can also use toast messages when there are some background errors.

  • They can be modified as you wish, they can be closed after the user decides to close them or they can disappear after some time (delay).

  • Don’t use uppercase text

  • Put the error message in the proper place. For example, if you have validation error messages for fields in form, place them so it is easy to understand which message is for each field.

Useful links for error handling:

How to implement toast messages on the client side?

I will explain how to implement and use toast service on the client side, in this example, using Angular 13.

We want to catch and show error messages in two cases, one is when they get from HTTP response and the second one is when we decide to show them because of failure on the client side.

We need first to download ngx-toastr module by running npm i ngx-toastr. You can check out more about ngx toastr on their GitHub. On the site, you can follow the instructions on how to implement it so you can use it in code: add CSS, add ToastrModule (and BrowserAnimationsModule).

To show all error messages we are receiving from the server side, we need to intercept them from HTTP response. In this case we can create and use a custom HTTP interceptor class and implement in it toast service.

@Injectable()
export class CustomHttpInterceptor implements HttpInterceptor {
 
     constructor(private spinnerService: SpinnerService, private toastrService: ToastrService) { }
 
    intercept(req: HttpRequest, next: HttpHandler): Observable<HttpEvent> {
 
        this.spinnerService.show();
 
        return next.handle(req)
             .pipe(tap((event: HttpEvent) => {
                    if (event instanceof HttpResponse) {
                        this.spinnerService.hide();
                    }
                }, (error) => {
                    if(error.status == 400) {
                        this.toastrService.error("Warning", error.error.Error)
                    } else if(error.status == 500){
                        this.toastrService.error("System error is occured");
                    }
                    this.spinnerService.hide();
                }));
    }
}

In the first example you will see how and when we are catching errors and how we will present them to the user to be user-friendly.

  update(category: CategoryDetail) {
    this.subsink.sink = this.categoryService
      .update(category.id, category)
      .subscribe((data) => {
        if (data != null && data.error) {
          this.toastrService.error("Update failed", data.error);
        } else {
          this.toastrService.success("Update was successful");
          this.loadCategories();
        }
        this._spinnerService.hide();
        this.loadCategories();
      });
  }

In the second example, you will see how to handle errors when getting the response for update functionality.

As you can see, you can easily use ngx-toastr!


How to handle errors on the server side?

As I mentioned it is very important for you are handling errors on the server side as well. You are also creating users error messages. 

I will give you just the direction on where to look and how to handle errors in ASP.NET Core 6.

When you check it out, you will see the example using interface IActionResult when sending back the response, where to register Exception Handling Middleware instances, how to create HttpResponseException by extending Exception, how to create an action filer HttpResponseExceptionFilter, etc.

Conclusion

As I mentioned before, error handling goes side by side with logging. Logging is a large topic that needs its own “space,” so it will be covered in the future. There is plenty of documentation on the internet for error handling based on different technologies. But most important is the documentation about it when you decide on the architecture you are going to use.

Also very important is the testing part of the development and also after, because hackers are going to test very uncommon cases to try to invoke errors that you didn’t have in mind to handle them.

Good luck in catching errors!

Cover photo by Eric Mclean!

#error_handling #error_messages

About Version 2 Digital

Version 2 Digital is one of the most dynamic IT companies in Asia. The company distributes a wide range of IT products across various areas including cyber security, cloud, data protection, end points, infrastructures, system monitoring, storage, networking, business productivity and communication products.

Through an extensive network of channels, point of sales, resellers, and partnership companies, Version 2 offers quality products and services which are highly acclaimed in the market. Its customers cover a wide spectrum which include Global 1000 enterprises, regional listed companies, different vertical industries, public utilities, Government, a vast number of successful SMEs, and consumers in various Asian cities.

About VRX
VRX is a consolidated vulnerability management platform that protects assets in real time. Its rich, integrated features efficiently pinpoint and remediate the largest risks to your cyber infrastructure. Resolve the most pressing threats with efficient automation features and precise contextual analysis.

Network Analysis and Automation Using Python

Introduction

Some people working as a SOC (Security Operation Center) relaying on the tools/solutions they are using in the first place for monitoring. But, some times you will need to do your own tool & automation to help you on the way you work or thinking “Your mindset”. So, this blog will explain how to use python with Scapy library along with tcpdump to analysis our network traffic & we will write an automation to detect port scanning as i will be performing the attack on the lab that contains 2 machines (Virtual Lab) first machine is the Attacker(Parrot OS) machine & the second is the Victim(Ubuntu).

Why Python and Scapy ?

As we all know Python is widely used and the reason to choose it, Is the easy syntax. It’s not effective language in performance for sure like C/C++,Go,Rust, etc.. But, it will not be complicated for these who want to use the easy way. Why specially Scapy and not other libraries ?. Basically, the Scapy library is so powerful and effective in manipulate, attack & scan networks “Low-Level library”. It’s easy to use and play with the large features. The most great thing about it is a widely used library and documentation for Scapy. Therefore, I will explain for you all the important usage for the library that you would need.

Capture the traffic

Now, we will set both of the machines to Host-Only adapter to avoid any other additional & junk traffic on the network. So, we got the attacker machine with the following IP 192.168.11.130 and the Victim machine with the following IP 192.168.11.131. We will perform some Port Scanning to discover the used services by the Victim machine, While we are running tcpdump on it to capture the network traffic will be generated by our actions. Let’s run tcpdump using the following command tcpdump -i <Interface> -w file_name.pcap.

Basically, the -i is to identify which interface the tcpdump will work on and -w to write the captured traffic into a file “You have to give the file name as a value”. Now, time to simulate our attack on the victim.

In the above picture we perform a Port Scanning using Nmap. As explain for the command in the screenshot:

  • -Pn: Disable ping request to the target.
  • -n: Disable DNS resolution.
  • --open: Display only open ports.
  • -v: For verbose.

Results show us that FTP & SSH services are running.

The reason why i disabled the ping and dns requests is to reduce the traffic & You could use nmap just to scan the 21/ftp port also, 22/ssh port using the -p option and give it the ports you wish to scan and separate it by , (e.x:-p 21,22,80,8080).

Read the traffic with

It’s the moment to analysis the traffic we captured. First, turn off tcpdump using CTRL+C keys. And after listening the files you will be able to see our captured file whicc is traffic.pcap as we saved.

Before we start we need python3 & Scapy package installed. You can install Scapy using pip as the following pip install scapy. Also, you can use a text editor for your code or an IDE, I am going to use Pycharm during this blog. let’s run our IDE and start coding.

So, Lets explain the above code to understand the basics of Scapy.

import scapy.all as scapy
import argparse

Here we import the libraries we do need, I imported Scapy as it’s the main one for our topic & i used argparse to parse the input using command line arguments.

parser = argparse.ArgumentParser()
parser.add_argument("-f", "--file", help="Read a single file.", type=str)
args = parser.parse_args()

We created our parser now and added an argument with type String. Then, we make the argument -f or --file. Then we parsed the arguments of our parser in args variable.

After that we created a function and naed it Start() and it takes one argument called file which gonna be the file path we will provide to analysis & read the data from the pcap file. Now, the actual code inside our Start() function.

  • print(f"[+] Reading: {file}"): Print the file path we provided.
  • p = scapy.rdpcap(file): Start read the pcap file and store it inside p variable.
  • packets = len(p): Get the length of the pcap file we have read which is also the number of packets and we stored it into packets variables.
  • print(f"[+] NUmber of packets {packets}"): Print the number of packets.

The following lines we created a for loop in range of packets number, that starts from index 0 to the packets number.

  • pkt = p[i]: Variable pkt to store the packet which the index is i referees to the packet number in the packets.

Now, to explain the rest of the code we need to under stand the format of the packets in Scapy & how its parsing them. So, we are going to use Scapy from the command Line Interface to explain it.

In the above picture we read the pcap file through the Command Line Interface for Scapy inside p variable and then we executed it and got the following output <traffic.pcap: TCP:2004 UDP:6 ICMP:0 Other:0>. It tells you information about the packets inside the file like: “Numbers of TCP,UDP, ICMP & others packets”. Now, if we try to show one of the packets for example packet number 1 using p[1] we will get the following results:

<Ether  dst=00:50:56:c0:00:01 src=00:0c:29:03:24:31 type=IPv4 |
<IP  version=4 ihl=5 tos=0x0 len=59 id=34743 flags=DF frag=0 ttl=64 proto=udp chksum=0x1b27 src=192.168.11.130 dst=192.168.11.1 |
<UDP  sport=50882 dport=domain len=39 chksum=0x980c |
<DNS  id=37950 qr=0 opcode=QUERY aa=0 tc=0 rd=1 ra=0 z=0 ad=0 cd=0 rcode=ok qdcount=1 ancount=0 nscount=0 arcount=0 qd=<DNSQR  qname='deb.parrot.sh.' qtype=AAAA qclass=IN |> an=None ns=None ar=None |>>>>

Explainig the output:

  • Ether: Layer 2 captured data like MAC address.
  • IP: Layer 3 captured data like Source & Destination address.
  • UDP: Layer 4 Used protocol and the Source & Destination ports.
    The rest are additional information according to the service used and the packet data. Also, the UDP could be TCP depending on the used type. For example the following packet is a TCP packet.
<Ether  dst=00:0c:29:0b:30:bd src=00:0c:29:03:24:31 type=IPv4 |
<IP  version=4 ihl=5 tos=0x0 len=60 id=23363 flags=DF frag=0 ttl=64 proto=tcp chksum=0x4723 src=192.168.11.130 dst=192.168.11.131 |
<TCP  sport=56544 dport=20000 seq=1686682144 ack=0 dataofs=10 reserved=0 flags=S window=64240 chksum=0x9884 urgptr=0 options=[('MSS', 1460), ('SAckOK', b''), ('Timestamp', (17410562, 0)), ('NOP', None), ('WScale', 7)] |>>>

Why we needed to know this ?, Cause when you want informations from the packet you have to specify the Layer you want data from and what data do you want for instance, You want the Destination port. So, we gonna fetch it as this packet["TCP"].dport. (packet["Layer"].key).

Now, Back to the rest of our code. we made an exception here in the following code:

First, it’s gonna try to check if the packet is TCP and will print the packet information with type TCP. If not the exception will print it as UDP type.

try:
    if pkt["TCP"]:
        print("========================================================")
        print(f'[+] Packt Number: {i}, Version: IPv{pkt["IP"].version}, '
              f'Type: TCP, Source IP: {pkt["IP"].src}, '
              f'Destination IP: {pkt["IP"].dst}, Source Port: {pkt.sport},  Destination Port: {pkt.dport}')
        print("========================================================")
except:
    print("========================================================")
    print(f'[+] Packt Number: {i}, Version: IPv{pkt["IP"].version}, '
          f'Type: udp, Source IP: {pkt["IP"].src}, '
          f'Destination IP: {pkt["IP"].dst}, Source Port: {pkt.sport},  Destination Port: {pkt.dport}')
    print("========================================================")

The information that will be printed:

  • Packt Number: {i}: Packet number.
  • pkt["IP"].version: IP version v4/v6.
  • pkt["IP"].src: Source IP.
  • pkt["IP"].dst: Destination IP.
  • pkt.sport: Source Port.
  • pkt.dport: Destination Port.

Running the code and the results:

Here we do grep from the shell to get the lines contain udp which are the UDP packets and it’s include all the information we added to the could to be printed.

Manual Analysis for Port Scan traffic

After all what we go through. Now, it’s the time to analysis our captured file manually using wireshark to see how the port scanning we performed is working and the traffic of the opened & closed ports. Then, we will use Scapy to automate the detection of port scanning. run wireshark from the command line and provide the file to it wireshark file.pcap

we can see a big traffic and to make the analysis more easy we gonna to compare the open ports traffic with the closed one.

Using the tcp.port==22 will show us traffic of port 22 which is SSH protocol. We can see that the attacker 192.168.11.130 connecting to 192.168.11.131 which is the victim on port 22 as the following:

  • Attacker Sends connection request on port 22 along with SYN flag
Attacker => SYN => Victim
  • Victim response with SYN/ACK flags which means the port is open
Victim => SYN/ACK => Attacker
  • Attacker send ACK flag which now is fully connected and can start use the service
Attacker => ACK => Victim
  • At the end attacker send RST/ACK which will close the connection with the victim
Attacker => RST/ACK => Victim

The above analysis was for an open port. So, let’s see how is it for a closed one for example one of the ports we know it’s closed like 8080 let’s filter it out using tcp.port==8080.

  • Attacker Sends connection request on port 8080 along with SYN flag
Attacker => SYN => Victim
  • Victim Response RST/ACK which means that no open ports
Victim => RST/ACK => Attacker

After we knew the behaviour for both open/closed ports in the traffic. Therefore, Let’s automate the detection.

Automated Analysis & Detection

From what we understand in the manual analysis we can check the flags for ports packets detect port scanning by analysis the attempts of connection on different ports. So, lets take the short path and search for failed connections in the packets and see if it’s for the same IP.

import scapy.all as scapy
import argparse

parser = argparse.ArgumentParser()
parser.add_argument("-f", "--file", help="Read a single file.", type=str)
args = parser.parse_args()

flag = []

def check_flags(attacker, server, port):
    if flag[0] == "S" and flag[1] == "RA":
        print(f'[!] Failed connection: {attacker} ====> {server}:{port}')


def Start(file):
    print(f"[+] Reading: {file}")
    p = scapy.rdpcap(file)
    packets = len(p)
    print(f"[+] NUmber of packets {packets}")

    for port in range(0, 65536):
        for i in range(0, packets):
            pkt = p[i]

            try:
                if pkt.sport == port or pkt.dport == port:
                    if pkt.dport == port:

                        flag.append(str(pkt["TCP"].flags))
                    elif pkt.sport == port:
                        flag.append(str(pkt["TCP"].flags))
                        check_flags(pkt["IP"].dst, pkt["IP"].src, port)
                        flag.clear()

            except:
                pass


Start(args.file)

The code will print the failed packets that try to connect to a closed port and print us out the results.

Let’s explain the code:
There are some parts of the code are the same to the above one. So, Just the new added lines will be explained

  • flag= []: created array.
  • for port in range(0, 65536): A for loop in range of all the ports number in the exist. The following lines we created a for loop in range of packets number, that starts from index 0 to the packets number. Therefore, we gonna take all packets and check if the Source Port or Destination Port in it is equal to our port number. Then, as the Destination Port is the first sent in the packet which will carry the SYN flag with it as a try to connect to this port, we gonna save it’s flag in the array first. Aبter that we save the flag coming from the Server which come on the same port as a Source Port. then we call the function check_flags and pass the arguments to it. What this function do is the following:
def check_flags(attacker, server, port):
    if flag[0] == "S" and flag[1] == "RA":
        print(f'[!] failed connection: {attacker} ====> {server}:{port}')

This function is taking 3 arguments which is the Attacker IPServer IP & the port number. After that it checks if the first & second elements of the array flag is equal to S & RA
Which means a failed connection on a closed port.

  • flag.clear(): clear the array after check.

Running the script:

As you can see a lot of failed connections from the same IP address on different ports. If you look clearly on the picture. You will see that port 22 not here cause it’s an open port and created a success connection.

Conclusion

At the end Port Scanning has a lot of types and what we saw in the blog was just an example. I would recommended that you go though Scapy documentation and try to perform different scanning types on your environment and analysis the traffic manually then automate it. Therefore, you will be able to detect that scan type.

#python #network #scanning #nmap

About Version 2 Digital

Version 2 Digital is one of the most dynamic IT companies in Asia. The company distributes a wide range of IT products across various areas including cyber security, cloud, data protection, end points, infrastructures, system monitoring, storage, networking, business productivity and communication products.

Through an extensive network of channels, point of sales, resellers, and partnership companies, Version 2 offers quality products and services which are highly acclaimed in the market. Its customers cover a wide spectrum which include Global 1000 enterprises, regional listed companies, different vertical industries, public utilities, Government, a vast number of successful SMEs, and consumers in various Asian cities.

About VRX
VRX is a consolidated vulnerability management platform that protects assets in real time. Its rich, integrated features efficiently pinpoint and remediate the largest risks to your cyber infrastructure. Resolve the most pressing threats with efficient automation features and precise contextual analysis.

×

Hello!

Click one of our contacts below to chat on WhatsApp

×