Skip to content

Remote virtual machine access using port forwarding and SSH private/public keys

Virtualization technology allows us to create multiple virtual machines (VMs) on the same physical machine.

A virtual machine operates like a software program running on a computer, simulating the behavior of an independent machine.

In essence, it establishes a computer within another computer.

When operating within a window on the host computer, a virtual machine offers users an experience that’s nearly identical to using a separate computer.

For many software developers, using a virtual machine is preferable for easy cross-platform compatibility purposes; they also offer greater security, flexibility, and scalability.

When setting up your virtual machine, you can access its graphic user interface (GUI) to interact with the virtual machine separately from the other machine(s) or operating systems on your physical computer.

However, relying solely on the GUI may not always be practical if you’re a software developer, especially if you need to access a VM remotely.

In such cases, you should use the Secure Shell protocol (SSH) to execute remote logins or commands securely over an unsecured network.

Parallels Desktop enables remote access to virtual machines with SSH and port forwarding.

By default, Parallels Desktop operates in shared network mode, which works “out of the box” and does not require any specific configuration.

Parallels Desktop will work as a virtual router for your virtual machines when you use this networking mode. However, it also means that the VMs cannot be accessed from external computers.

The port forwarding (also known as port mapping) functionality allows computers on your local network and the Internet to connect to any virtual machines that use the shared networking mode.

According to the port-forwarding rule, the connection to a specific port on your Mac will be redirected to a specific port of your virtual machine.

To gain remote access to a VM via port forwarding, you must first configure Parallels Desktop to accept the connection using a port forwarding rule.

This is achieved by following the process outlined below.

Establishing port forwarding rules

Note: Port forwarding is only available in Parallels Desktop for Mac Pro and Parallels Desktop Business Edition.

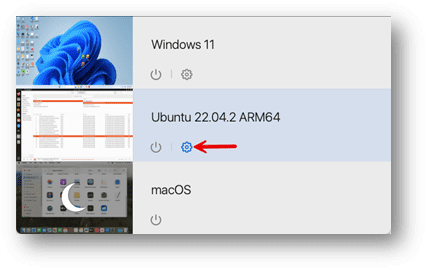
1. Open the Parallels Desktop Command Center

2. Select the VM you want to access remotely 

Then, click the Configure button.

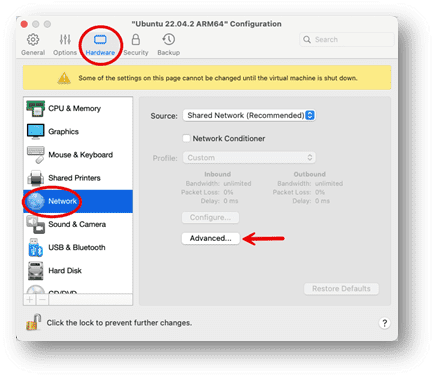
3. Once the Configuration window opens, select the Hardware tab

Then the Network option on the left side, then click “Advanced.”

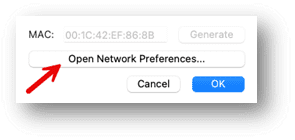
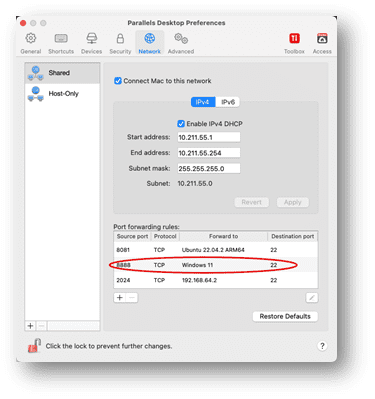
4. Click on the “Open Networking Preferences” button

5. Click the Add (+) button below the Port forwarding rules list

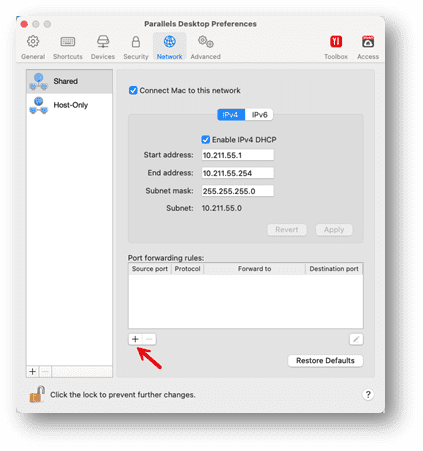
6. In the displayed window, perform the following actions

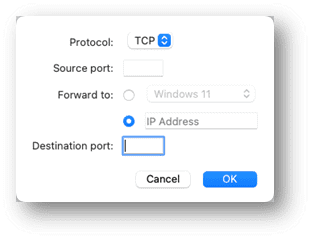
  • In the Protocol field, specify the port type you want to establish network connections. You can choose between the TCP or UDP port types.
  • In the Source Port field, type the incoming port number on your Mac.
  • In the Forward to section, indicate the name or IP address of the virtual machine you want to connect to.
  • In the Destination Port field, type the port on the virtual machine to which the data will be transferred.

  7. Click OK to add the rule

Checking port forwarding

To check that the rule works properly, enable, e.g., SSH on your virtual machine (some Linux distributions have it enabled by default).

As an example for SSH, use the following rule:

Protocol TCP
Source PortChoose a different port number between 1024 to 49151 for each VM
Forward toChoose your virtual machine
Destination Port22

To make sure that port forwarding is enabled from your Mac inside a virtual machine, use one of the following scenarios (in these examples, port 8081 is redirected to a Linux VM, and port 8888 is to a Windows VM) :

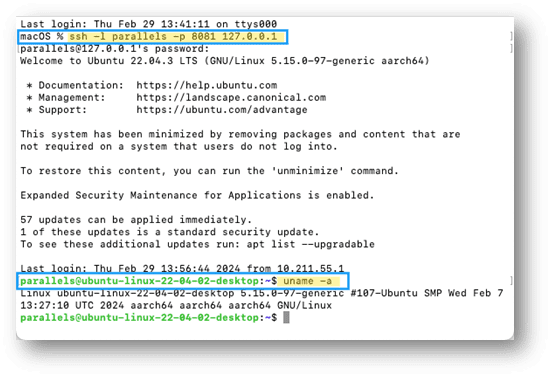
Scenario 1: connect from the same Mac

In Terminal, type in the following command and press Enter:

ssh -l <your_VM_username> -p <source_port> 127.0.0.1

Enter the password for the user in the virtual machine and press Enter:

Scenario 2: connect from another Mac or PC in the same network

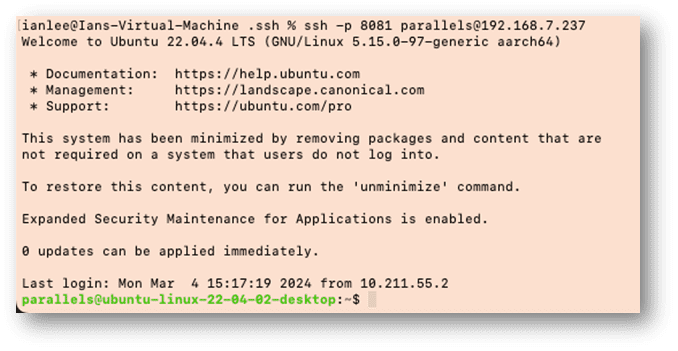
In Terminal (on Mac) or PowerShell (on Windows), type in the following command and press Enter:

ssh -l <your_VM_username> -p <source_port> <host_machine_IP_address>

Enter the password for the user in the virtual machine and press Enter.

To check that you logged into the virtual machine, execute the following command in Terminal:

uname -a

If you successfully log into the virtual machine, you will see a Linux kernel version.

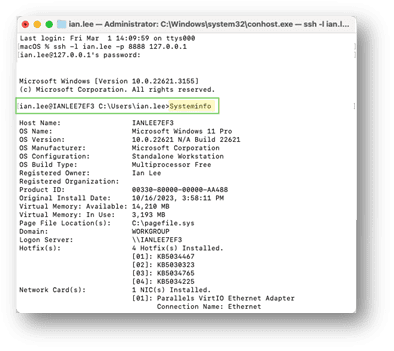
The same method can also be used to set up an SSH port forward for a Windows machine by adding that to the port forwarding list:

You can run a “systeminfo” command to verify the system you are on.

Using SSH key pairs

Now we have the systems tested and working using password authentication, we can make them more secure.

SSH public/private keypairs offer a more secure, convenient, and scalable authentication mechanism than traditional password-based methods.

By leveraging SSH keypairs, organizations can strengthen their security posture and ensure secure remote access to their systems, eliminating the need to transmit passwords over the network.

With keypairs, the private key remains securely stored on the user’s computer.

In contrast, the public key is stored on the server, significantly reducing the risk of interception by malicious actors.

Because the keypairs are generated using cryptographic solid algorithms, they are much longer than passwords, making them highly resistant to brute force attacks.

Once SSH keypairs are set up, users can seamlessly log in to SSH-enabled systems without entering a password, adding convenience for automated processes and scripts.

Generating SSH public/private keys

The SSH key pair consists of two cryptographic keys: public and private keys.

These keys are mathematically related but are designed so that it is computationally infeasible to derive the private key from the public key.

The public key is shared securely with the server or system you want to access.

It can be freely distributed and stored on several servers or systems and is provided when you attempt to connect to a server.

The private key is kept securely on your local computer or device. It should never be shared with anyone else.

This key is used to decrypt encrypted messages with the corresponding public key, and when you attempt to connect to a server, your local SSH client uses your private key to prove your identity.

When you attempt to connect to a server using SSH, the server sends a message encrypted with your public key.

Your SSH client decrypts this message using your private key and sends back a response.

If the server can successfully decrypt your response using your public key, it knows you possess the corresponding private key, allowing you to access the system.

SSH keypairs are typically generated using cryptographic algorithms such as RSA or DSA.

Your local SSH client software can generate these keys for you. The keys are often stored in files (e.g., “id_rsa” for the private key and `id_rsa.pub` for the public key) in a hidden .ssh directory in your user’s home directory.

Creating SSH keypairs

To explain how to generate and use the SSH keypairs, I have three systems: a Mac, which is my local machine; an Ubuntu VM, which will be the remote machine; and a Mac VM, which will use the port forwarding rules.

Each system has a different theme for the terminal windows to make it easier to follow.

First, I will check my local machine to ensure no local keys exist, using the command:

ls ~/.ssh/id_*

As no matches were found, no keys were present on our local machine. If they are present, you should back them up in case they are accidentally removed or lost.

Next, we can generate our SSH key on the local machine.

To do this, type in the command:

ssh-keygen

The command replies that it is generating a public/private keypair using rsa as the default encryption.

If you wish to use a different algorithm you can use the -t flag to select from the following alternatives: dsa, ecdsa, ecdsa-sk, ed25519, ed25519-sk.

I will also add a comment using the -C flag so that I can quickly identify what the key is for.

My command line would look like this:

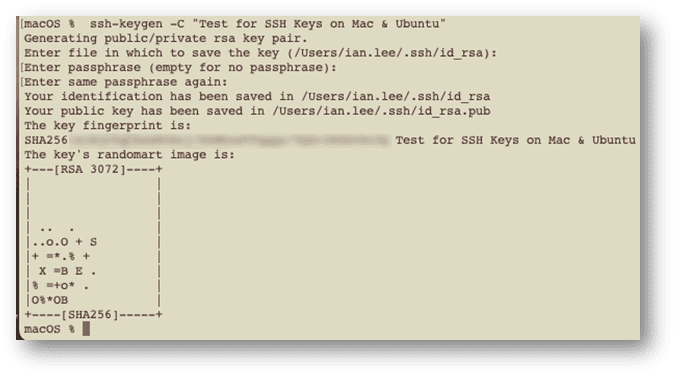
ssh-keygen -C "Test for SSH Keys on Mac & Ubuntu"

By default, the file is saved in my user directory in the .ssh folder, so I hit enter to accept that.

I also hit enter for the passphrase question, which adds an extra layer of security but also means I would have to enter it each time I connect. I am trying to avoid that in this example.

Retrieving the public key

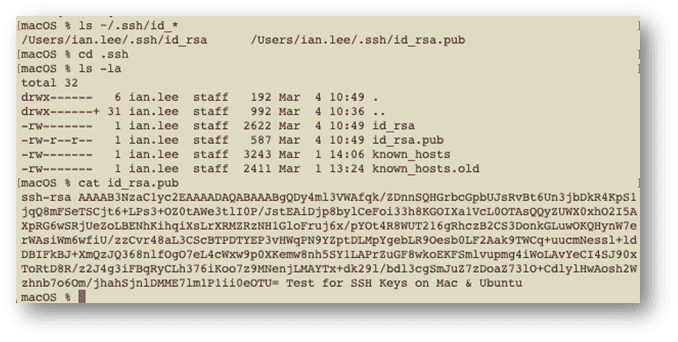
If we rerun the ls command, we can see two files in the .ssh directory: the private and public keys.

Move into the .ssh directory, open the contents of the public file, and copy them so that we can add them to the remote machine in a file called authorized_keys.

cd .ssh 

ls -la 

cat id_rsa.pub

Adding the public key to the remote machine

To enable SSH access to a remote machine, you must upload the public key from your SSH key pair onto the remote server. This allows the remote machine to decrypt connections initiated by your local computer, which uses its corresponding private key for encryption.

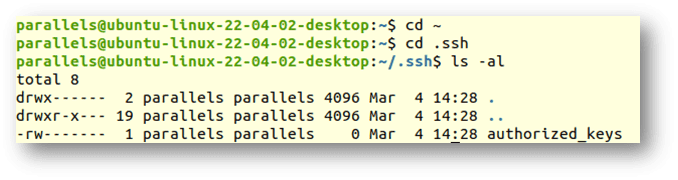
On the remote machine, go to your home directory and check if the .ssh subdirectory exists:

cd ~
ls -al ~

If it does exist cd into that directory, and if it doesn’t, create the subdirectory, and then go into it and check to see if the authorized_keys file exists:

mkdir .ssh
cd .ssh
ls -al

If the authorized_keys file does not exist, create one using the following command:

touch authorized_keys

Then edit the file using your editor of choice to add the public key copied from the local machine.

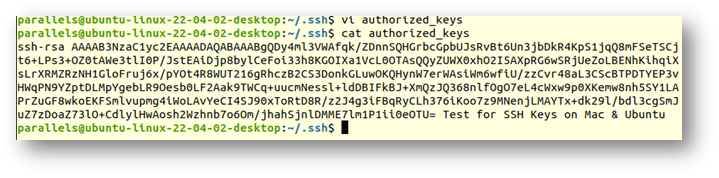
If you already have an authorized_keys file in the directory with content, add your new key on a new line and save the file.

Putting it all together

Now that our private and public keys are created, we need to check that they work.

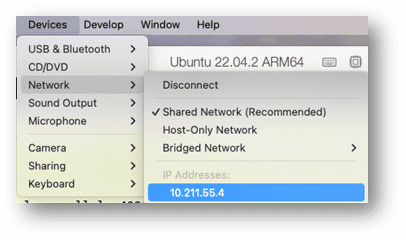
Check the IP address of your virtual machine from the Parallels devices-> networking tab

Now ssh into that system from your local host that has the private key installed on it:

ssh <user>@<ip address>

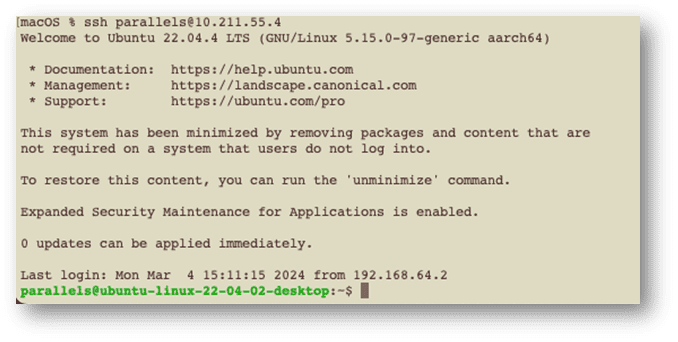
And as you can see, we are logged in without providing a password.

As we have set up port forwarding on our local host, we should also be able to access the Ubuntu VM from a different system, but going through the host machine and using the port that was assigned at the beginning of this article, that being 8081 of the Mac system.

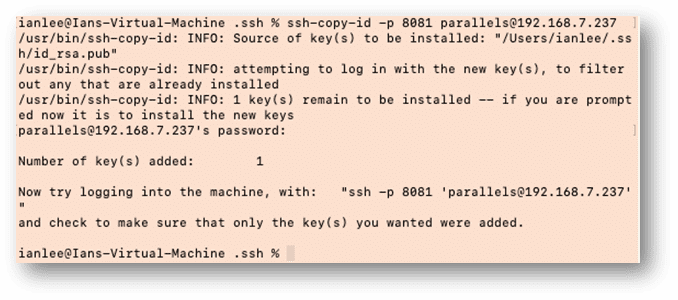
If I go to my Mac VM running on the same host, I can copy a key to the Ubuntu box, but this time, instead of cut/paste, I will use the ssh-copy-id command to add to my authorized_keys file on the Ubuntu system, but using port 8081 of my host system:

ssh-copy-id -p <port> <user>@<ip address>

We can check the key was correctly added by going back to the Ubuntu VM, and checking the authorized_keys file:


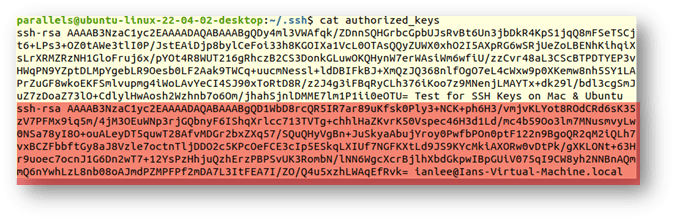
The text highlighted in red is the new key from the Mac on the VM. If we return to that VM, we can execute the ssh command displayed at the end of the ssh-copy-id command message to access the Ubuntu VM system from my Mac’s VM system via my host Mac:

And as you can see from the command prompt at the end, I am back on the Ubuntu System.

Ready to try it yourself? Sign up now for a free 14-day trial to see how easy it is to implement port forwarding and secure key pairs using Parallels Desktop Pro. 

About Version 2 Digital

Version 2 Digital is one of the most dynamic IT companies in Asia. The company distributes a wide range of IT products across various areas including cyber security, cloud, data protection, end points, infrastructures, system monitoring, storage, networking, business productivity and communication products.

Through an extensive network of channels, point of sales, resellers, and partnership companies, Version 2 offers quality products and services which are highly acclaimed in the market. Its customers cover a wide spectrum which include Global 1000 enterprises, regional listed companies, different vertical industries, public utilities, Government, a vast number of successful SMEs, and consumers in various Asian cities.

About Parallels 
Parallels® is a global leader in cross-platform solutions, enabling businesses and individuals to access and use the applications and files they need on any device or operating system. Parallels helps customers leverage the best technology available, whether it’s Windows, Linux, macOS, iOS, Android or the cloud.

Conquer new worlds in Age of Empires on your Mac

In a world where strategy is paramount and maintaining your dominion requires both strength and wisdom, the Age of Empires games have long captivated players with their immersive universe of historical grandeur and warfare.

This iconic series invites players to traverse time by commanding powerful civilizations through the ages, from the humble beginnings of the Stone Age to the formidable heights of the Imperial Age.

Through meticulous management of resources, strategic planning, and diplomatic finesse, players shape the destinies of empires, leading their chosen people to glory or ruin.

https://www.parallels.com/blogs/age-of-empires/(opens in a new tab)

For loyal Mac users, the dream of commanding mighty civilizations once seemed a distant fantasy, hindered by the lack of availability for Mac and Windows exclusivity.

It’s no longer an epic battle to play Age of Empires games on your Mac, especially the popular Age of Empires II: Definitive Edition. This could be the pinnacle of the Age of Empires universe — at least according to fans of the beloved series.

With Parallels Desktop, players can weave together the olden times and the modern era on their hardware of choice.

Discover how you can step into epic tales of the past, equipped with your trusty Mac.

If you’re ready to embark on this legendary journey through the Age of Empires, let the gaming capabilities of Parallels Desktop Pro lead the way.

How to play Age of Empires on a Mac

It’s time to take command of your realm in the Age of Empires. Here’s how to get started conquering new realms in Age of Empires II with Parallels Desktop:

1. Install Parallels Desktop

If you don’t already have it, download and install the latest version of Parallels Desktop. The Pro or Business edition is recommended for the best gaming performance.

2. Create a Windows 11 Virtual Machine

Open Parallels Desktop and set up the Windows 11* virtual machine using prompts on the screen.

3. Adjust virtual machine settings on Pro or Business Edition

Access the Parallels Desktop Control Center and navigate to the “Hardware” section.

If you are using Parallels Desktop Professional or Business editions, you can adjust the virtual machine settings by allocating an adequate amount of RAM, CPU, and GPU resources to ensure a seamless gaming experience.

You can accomplish this by enabling the Gaming Profile.

When the Gaming Profile is enabled, Parallels Desktop provides more RAM and CPU to Windows, enters full-screen view for greater immersion, and toggles the mouse mode for better compatibility with games.

To enable the Gaming Profile:

1. Shut down Windows via the Start menu and open its configuration

2. Click “Change” and select “Games only”. 

*Note that you’ll need to purchase a Windows license if you don’t already have one.

Can I run Age of Empires II: Definitive Edition on Mac?

Age of Empires II: Definitive Edition is primarily designed for Windows but can be run on Mac using virtualization software like Parallels Desktop.

As a Mac user, you can experience the excitement of building empires and leading armies in this legendary game if your Mac meets the minimum requirements:

RequirementMinimal
OSWindows 10
ProcessorIntel Core 2 Duo or AMD Athlon 64×2 5600+
GraphicsNVIDIA® GeForce® GT 420 or ATI™ Radeon™ HD 6850 or Intel® HD Graphics 4000 or better with 2 GB VRAM
DirectXVersion 11
NetworkBroadband Internet Connection
Storage15 GB available space
Memory4 GB RAM

Does Age of Empires work on an M-series Mac?

Yes, you can transform your Mac into a formidable stronghold for playing Age of Empires on an M1, M2, or M3 chip Mac.

This video guide covers everything from setting up your virtual machine to improving its performance, getting you ready to play Age of Empires II: Definitive Editions as if you were playing on a Windows machine.

What versions of Age of Empires work on Mac?

The Age of Empires franchise has journeyed through time, with nine games released since 1997. Each chapter adds new lands to conquer, civilizations to develop, and challenges to overcome. As the series progresses, it brings more sophisticated gameplay, diverse cultures, and deeper historical narratives.

The Age of Empires universe encompasses:

  • Age of Empires (1997)
  • Age of Empires: The Rise of Rome (Expansion – 1998)
  • Age of Empires II: The Age of Kings (1999)
  • Age of Empires II: The Conquerors (Expansion – 2000)
  • Age of Mythology (2002)
  • Age of Mythology: The Titans (Expansion – 2003)
  • Age of Empires III (2005)
  • Age of Empires III: The WarChiefs (Expansion – 2006)
  • Age of Empires III: The Asian Dynasties (Expansion – 2007)
  • Age of Empires: Definitive Edition (2018)
  • Age of Empires II: Definitive Edition (2019)
  • Age of Empires III: Definitive Edition (2020)

With the release of Age of Empires IV in October 2021, the series achieved new heights, offering advanced graphics, refined mechanics, and an even broader historical scope.

The good news? You can play any of the Age of Empires games that are available on Windows on your Mac, provided your Mac meets the minimum game requirements.

Playing Age of Empires on Mac

The barriers that once prevented Mac users from partaking in the grand sagas of Age of Empires have been dismantled — if you use Parallels Desktop.

Embrace the challenge of strategy, conquer distant civilizations, and relive pivotal moments of history, all from sleek platform of your Mac.

Whether you’re strategizing the construction of your empire from the ground up, leading your armies into battle, or negotiating peace treaties, Parallels Desktop + Age of Empires provides an immersive gaming experience.

Ready to start your conquest and claim your place in history?

If your heart is set on this legendary odyssey, Parallels Desktop is the gateway to this epic voyage through time. 

About Version 2 Digital

Version 2 Digital is one of the most dynamic IT companies in Asia. The company distributes a wide range of IT products across various areas including cyber security, cloud, data protection, end points, infrastructures, system monitoring, storage, networking, business productivity and communication products.

Through an extensive network of channels, point of sales, resellers, and partnership companies, Version 2 offers quality products and services which are highly acclaimed in the market. Its customers cover a wide spectrum which include Global 1000 enterprises, regional listed companies, different vertical industries, public utilities, Government, a vast number of successful SMEs, and consumers in various Asian cities.

About Parallels 
Parallels® is a global leader in cross-platform solutions, enabling businesses and individuals to access and use the applications and files they need on any device or operating system. Parallels helps customers leverage the best technology available, whether it’s Windows, Linux, macOS, iOS, Android or the cloud.

How encryption evolved to protect us from ISPs

Why ISPs monitor our traffic

ISPs are usually large telecommunications companies that manage the networks – digital subscriber line (DSL), cable, fiber optic, satellite, etc. – that facilitate ‘the information superhighway’ of internet traffic. ISPs also distribute modems and routers (usually an all-in-one box) that enable us to use the internet on multiple devices at home or elsewhere. It is through this infrastructure that ISP monitoring takes place.

It’s important to note that there are a few legitimate reasons as to why an ISP might monitor our traffic. Here are a few examples:

  • Service quality – ISPs allocate bandwidth to optimize service based on use. For example, streaming and online gaming require high speed, uninterrupted connections, so they’re given a higher priority. Simpler web activities like browsing or sending emails, which aren’t as sensitive to minor hiccups or delays, are given a lower priority.

  • Security – ISPs monitor traffic for signs of malicious activities like malware distribution, phishing attacks, and DDoS (Distributed Denial of Service) attacks. They do this primarily to keep their user base secure and intact, but can also market security upgrades and products.

  • Customer support – With a clear overview of user home networks, devices, and traffic patterns, ISP customer support can solve issues faster – and cheaper. They can often remotely access ISP-provided routers as well.

  • Regulation – ISPs can be legally obliged to pass user data to law enforcement in certain cases and are required to monitor traffic for illegal activity.

  • Targeted advertising – You stream movies? Oh, you need a 4K TV! ISPs build user profiles based on web activity, then upsell products to you or pass your profile to data brokers for targeted advertising.

There are cases when ISPs sell your data. A 2021 Federal Trade Commission report found that, in the US: “Even though several ISPs promise not to sell consumer personal data, they allow it to be used, transferred, and monetized by others, and hide disclosures about such practices in the fine print of their privacy policies.”

How ISPs monetize our data. Source: Federal Trade Commission

How ISPs monetize our data. Source: FTC

What stops ISPs from collecting your data?

1. Regulatory requirements

  • The EU’s GDPR tightly controls how ISPs collect, store, and process personal data, which generally ensures a higher level of privacy for users.

  • The US is lacking in this area, with no broad federal legislation in place, resulting in a state-by-state patchwork of privacy laws.

  • Australia, Brazil, Canada, the EFTA countries, Japan, South Korea, and Switzerland have all enacted data protection regulations.

2. Encryption

In the old days (the wild ‘90s), there was none – ISPs could see everything. Except for some e-commerce and banking services, encryption was almost non-existent. Then in 1995, Taher Elgamal of Netscape developed Secure Sockets Layer (SSL) to secure transactions. This innovation started us down the long and winding road of encryption protocols and their eventual wide scale adoption.

A brief history of SSL to TLS

Secure Sockets Layer (SSL) was developed by Netscape, the pioneering web browser developer, as a protocol to secure transactions. SSL 2.0 was the first version released to the public in 1995. SSL 3.0, which fixed many of the vulnerabilities found in SSL 2.0, came in 1996. The groundwork was laid for future internet security protocols.

Transport Layer Security (TLS) was introduced in 1999 as TLS 1.0 by the Internet Engineering Task Force. Since then, TLS has been the internet’s security standard, undergoing multiple updates and improvements. TLS 1.2, released in 2008, added support for stronger encryption algorithms and was widely adopted for its enhanced security features.

TLS 1.3 arrived in 2018. With a simplified “handshake” process, fewer interactions were needed between client and server to authenticate one another and establish a secure connection. Boasting faster and more robust cryptographic algorithms, TLS 1.3 was a big step forward in speed, security, and privacy.

As of February 2024, 99.9% of the 150,000 most popular websites support TLS 1.2. 67.8% support TLS 1.3, and that number is growing every day.

Timeline of SSL to current day.

SNI: Scaling up the internet

Server Name Indication (SNI), an extension to TLS introduced in 2003, massively scaled up the internet’s hosting capacity. By specifying the target hostname during the “Client Hello” message (the first step in the TLS handshake), multiple HTTPS websites or services could now share a single IP address. With IPv4 addresses running out at the time (total exhaustion occurred in 2011), this was essential to keeping the internet up and running.

SNI was integrated with the QUIC protocol in 2021, boosting performance and security further. But a problem remained. SNI is unencrypted and exposes the hostname (website) that the client is trying to connect to. This issue was highlighted when certain governments including South Korea’s began using SNI filtering as a more precise means of censorship and surveillance. SNI’s purpose had been abused by ISPs and governments to collect data.

ESNI, ECH: Final piece of the security puzzle – or not?

So along came Encrypted Server Name Indication (ESNI). Introduced in 2018, it aimed to do exactly what it says on the tin: encrypting SNI. But it would only serve as a stopgap. Cloudflare, the web services company who helped develop the standard, said: “While ESNI took a significant step forward, it falls short of our goal of achieving full handshake encryption. Apart from being incomplete — it only protects SNI — it is vulnerable to a handful of sophisticated attacks.”

Most recently in line was Encrypted Client Hello (ECH) with the more ambitious goal of encrypting the entire Client Hello message. Cloudflare rolled out ECH as a TLS 1.3-exclusive extension in September 2023, but disabled it the following month to address “a number of issues”. A re-release is planned for 2024.

However, even with ECH in place, privacy concerns won’t fully go away. ECH doesn’t fully circumvent traffic analysis or ‘sniffing’ techniques that can reveal metadata like connection times, duration, packet sizes, and more – enough to start a basic user profile for tracking. And users’ IP addresses are still always exposed when online. The Internet Protocol routes online traffic, and the client-server model for data transmission wouldn’t work without visible IP addresses.

DNS: Falling short in privacy

Closely related to the IP routing system is the Domain Name System (DNS), known as ‘the internet’s phone book.’ DNS maps domain names to IP addresses. When you type a domain name like www.example.com into your browser search bar, the browser has to find out the domain’s corresponding IP address in order to request the domain’s content for you. To do this, your computer first sends a request to a DNS server, which returns the domain’s IP address (e.g. 142.250.105.100). Without this system, your browser wouldn’t know where to go.

The problem is, ISPs often run their own DNS servers to take a peek as these requests are filled. ISP-provided routers come preconfigured to direct your DNS queries to their proprietary servers. And if ISPs control a DNS server, they can effectively block the use of Encrypted Client Hello by not including ECH configurations in the HTTPS resource records returned to clients.

Protocols like DNS-over-HTTPS (DoH) and DNS-over-TLS (DoT), which encrypt DNS requests, offer solutions to this issue. Not to be outdone, ISPs started operating their own DoH services, controlling DNS settings, and limiting configuration changes. Some providers even argued that DoH is not in the consumer’s interest. Remember: if the ISP runs the DoH service, they can see your online activities.

Even without using DNS or connecting to the wider internet, ISP-managed routers can collect information about the devices connected to them. They can track the unique Media Access Control (MAC) of each device. MAC allows devices to communicate on a local network segment, with the data being openly visible to anyone on the same network. ISPs use software on their routers to capture, fingerprint, and identify devices and their MAC addresses.

What can we do while we wait for ‘total’ encryption?

There are a few things you can take care of.

1. Be aware if you use an ISP managed router

Did it arrive at your door, perhaps with a technician ready to install it, after you signed up? Then it’s managed by the ISP, or at least set to their favored default configurations. Log in to the router, change the default password, and make sure you’re using at least WPA2 encryption. Keep in mind that if you’re using wifi calling (WhatsApp, Facetime, etc), your speech travels through these devices – another reason to fortify your network security.

2. Use a trustworthy DNS server

Look for public, privacy-focused public DNS servers. For example, Cloudflare DNS (1.1.1.1) doesn’t log DNS traffic, doesn’t save your IP address, and doesn’t sell user data to advertisers.

3. Use a VPN

Virtual private networks (VPNs) can protect your online activity by encrypting traffic going from your device to a VPN server. This server then handles your internet requests, shielding them from ISP surveillance. This protection extends to DNS queries if you use the VPN’s DNS server. Of course, using a VPN transfers your trust from the ISP to the VPN provider. That’s why no logs VPNs are among the best ways for keeping yourself safe and secure online today.

About Version 2 Digital

Version 2 Digital is one of the most dynamic IT companies in Asia. The company distributes a wide range of IT products across various areas including cyber security, cloud, data protection, end points, infrastructures, system monitoring, storage, networking, business productivity and communication products.

Through an extensive network of channels, point of sales, resellers, and partnership companies, Version 2 offers quality products and services which are highly acclaimed in the market. Its customers cover a wide spectrum which include Global 1000 enterprises, regional listed companies, different vertical industries, public utilities, Government, a vast number of successful SMEs, and consumers in various Asian cities.

About NordLayer
NordLayer is an adaptive network access security solution for modern businesses – from the world’s most trusted cybersecurity brand, Nord Security.

The web has become a chaotic space where safety and trust have been compromised by cybercrime and data protection issues. Therefore, our team has a global mission to shape a more trusted and peaceful online future for people everywhere.

Empowering resellers: SaaS data protection with Keepit

As businesses increasingly rely on cloud-based applications and services to drive productivity and innovation, the need to safeguard sensitive data against cyber threats and unexpected data loss is clear — not least of all due to increased compliance requirements globally such as NIS2, SEC, and GDPR.

Partnering with Keepit means always being at the forefront of cloud SaaS data protection.

Anders Kaag 

CMO of ITM8, Denmark 

In joining Keepit’s newly enhanced Partner Network with a partner-only focus, value-added resellers (VARs) can empower their clients with industry-leading cloud data protection, ensuring the safety and integrity of their critical business data.

In this blog, we’ll explore why Keepit is not only the ideal partner but also the best solution on the market for resellers looking for the opportunity to elevate their services, increase profitability, and stand out from the competition with Keepit’s leading cloud data protection solution.

“We are pleased to continue our partnership with Keepit and to join their new KPN partner program. The team we collaborate with is extremely responsive and always on hand to assist with any of our queries. The new program recognizes our efforts in terms of skills and commercial success and will accelerate our development and growth in the coming years in the field of SaaS data protection.”

Nicola Gargett 

Partner Program Manager 

Phoenix Software Ltd., UK  

Top 3 reasons to join the VAR track of the Keepit Partner Network  

Here’s why the Keepit Partner Network is a great opportunity for resellers wanting to support their clients: 

1. Increased gross profit and recurring revenue:

Keepit offers resellers the chance to quickly boost their gross profit and establish a long-term recurring revenue stream, all without the burden of operational expenses. By partnering with Keepit, resellers can retain their gross profit, fuel their growth, and protect their margins with a partner-only go-to-market strategy.

2. Partner-friendly tools and support:

Keepit is easy to work with and easy to price. Managing customers’ accounts is made simple with Keepit’s ready-to-use Partner Management Console or seamless integration options with favorite systems using APIs. This allows resellers to stay aligned with the buyer’s journey.

3. Be a hero for your customers:

With Keepit, resellers can be heroes for their customers by offering a fast and easy-to-implement solution. Whether it’s providing fast provisioning or one-click restore capabilities, Keepit enables resellers to deliver exceptional value to their clients. Differentiate from the competition by offering the most comprehensive SaaS data backup coverage on the market. 

We don’t compete with Keepit, we succeed together. An equal partnership was the goal from the very beginning.

Henning Malmin  

CTO of Upheads, Norway 

The Keepit difference for customers and partners

Keepit doesn’t just offer benefits for resellers; we also provide unparalleled advantages for customers and partners alike. Many of Keepit’s partners have a hybrid business model, acting as both Managed Service Providers (MSPs) and value-added resellers (VARs). Keepit’s solutions are flexible enough to support both models, allowing resellers to seamlessly integrate SaaS data protection into their managed services practices. 

What makes Keepit the best SaaS data protection for partners and customers 

From our dedicated, purpose-built independent cloud to our native data immutability and compliance-ready architecture, Keepit ensures that both partners and their customers receive top-notch service and protection with the broadest SaaS applications protection available, including Microsoft 365, Entra ID (Azure AD), Salesforce, and more.

Here’s why Keepit is the leading solution for resellers wanting to best support their clients on their data protection journey: 

  • Independent cloud: 

Keepit owns and operates a dedicated, purpose-built independent cloud infrastructure, ensuring maximum security, reliability, and compliance for partners and their customers’ data. 

  • Built in the cloud, for the cloud: 

The Keepit solution is designed and optimized specifically for the cloud environment, storing data logically and physically separate from the SaaS vendor. It provides seamless integration and performance for SaaS data protection without any of the issues or inefficiencies found in solutions with legacy bolt-on systems. 

  • Multiple data centers with fully load-balanced redundancy: 

We ensure data availability and data resiliency 24/7 with dual data centers per data region of choice, featuring fully load-balanced redundancy and air-gapped data storage. This maximizes data protection and data availability, supporting business continuity goals.

  • Native, built-in data immutability: 

Keepit’s platform incorporates native data immutability, safeguarding data from unauthorized alterations or deletions and providing assurance of data integrity through blockchain-like encryption. Data remains tamper proof, always.

  • Transparent, predictable, all-inclusive pricing: 

Keepit operates on a transparent pricing model with no hidden fees. This makes it easy for partners and their customers to budget and plan effectively. 

  • Simple tool onboarding process: 

Keepit’s intuitive setup process and automated features allow for easy implementation and management, with no training needed. This frees up time and resources for partners to focus on other aspects of their business.

  • Granular restore functionality: 

We simplify data recovery with granular, one-click restore functionality. This enables partners and customers to swiftly recover critical data in place in the event of data loss or disruptions, prioritizing business-critical data to minimize impact.

  • Recognized industry leadership: 

Keepit is consistently recognized as a leader in SaaS data protection by industry analysts. This demonstrates our commitment to delivering top-tier solutions and services.

  • GDPR compliance and data privacy: 

With no sub-processors, Keepit prioritizes compliance, ensuring that partners and their customers’ data is handled with the highest level of sensitivity and adherence to regulations. This includes support for GDPR right to be forgotten (RTBF). 

Differentiate, diversify, and grow with Keepit 

Don’t settle for selling the same solutions as everyone else in the market. With Keepit, resellers can differentiate themselves, diversify their offerings, and accelerate their growth in the field of SaaS data protection. 

Keepit offers resellers the perfect combination of partner-friendly tools, unparalleled support, and innovative solutions to succeed in today’s competitive landscape. Ready to elevate your reselling business with Keepit’s leading cloud data protection solution? Join the Keepit Partner Network today and unlock exclusive benefits, unparalleled support, and innovative solutions to drive growth and success.

About Version 2 Digital

Version 2 Digital is one of the most dynamic IT companies in Asia. The company distributes a wide range of IT products across various areas including cyber security, cloud, data protection, end points, infrastructures, system monitoring, storage, networking, business productivity and communication products.

Through an extensive network of channels, point of sales, resellers, and partnership companies, Version 2 offers quality products and services which are highly acclaimed in the market. Its customers cover a wide spectrum which include Global 1000 enterprises, regional listed companies, different vertical industries, public utilities, Government, a vast number of successful SMEs, and consumers in various Asian cities.

About Keepit
At Keepit, we believe in a digital future where all software is delivered as a service. Keepit’s mission is to protect data in the cloud Keepit is a software company specializing in Cloud-to-Cloud data backup and recovery. Deriving from +20 year experience in building best-in-class data protection and hosting services, Keepit is pioneering the way to secure and protect cloud data at scale.

Web3 security: risks and best practices for staying safe

Web3 stands out as a new wave of innovation, offering a future where users have more control over their data and online interactions. However, this potential also brings new challenges, especially in security. Let’s carefully look into the security risks of Web3, giving you the information you need to move forward in this exciting yet risky area safely. 

Key takeaways

  • Web3 marks the start of a decentralized internet, focusing on better privacy, security, and control over data for users.

  • Companies like IBM, Walmart, and Visa are embracing Web3. They’re navigating through complex tech and changes in how things are done but find value in the stronger security and smoother operations it offers.

  • The security setup of Web3 relies on spreading out data, using secure codes, and self-executing contracts to protect against common online threats.

  • Despite its advantages, Web3 isn’t free from security challenges such as issues in contract code or scams aiming to steal information.

  • Moving to Web3 in a way that works well means putting together a solid plan for staying safe, keeping up with new information, and using the right tech.

What is Web3?

Web3 represents the internet’s new era, embracing decentralization and blockchain technology. This approach contrasts with Web2’s centralized model, where big tech firms hold the reins. This shift aims to give people back control over their data, prioritizing their privacy and security, which were major concerns in the previous internet phase.

Thanks to a growing interest in cryptocurrencies, decentralized apps, and smart contracts, Web3 is expanding quickly. Its core values include transparency, the empowerment of users, and a secure, unchangeable record of transactions. The goal is to build an internet that values fairness and centers around its users.

The transformative impact of Web3 on businesses

Web3 offers businesses enhanced security by distributing data across decentralized networks. Many companies, big and small, are exploring it. IBM, a technology giant, uses blockchain to streamline operations and increase data integrity. Walmart, a retail powerhouse, employs blockchain technology to build supply chain transparency and consumer trust. Visa, a global payments leader, settles transactions in cryptocurrency, exploring decentralized finance’s potential. Nike, a sportswear innovator, ventured into digital assets by acquiring a digital sneakers studio and tapped into new markets. Starbucks, a coffeehouse chain, introduces a blockchain loyalty program offering customers transparency in their coffee journey. Maersk, the world’s largest shipping company, improves global trade efficiency with its blockchain solution, TradeLens.

Despite these benefits, businesses face challenges like technological complexity and regulatory uncertainty. Adapting to Web3 requires shifts in corporate culture toward decentralization.

Web3’s cybersecurity backbone

Web3 cybersecurity includes features that make the digital world safer and more trustworthy. Let’s go through them one by one, explaining what each is and how it boosts security.

Web3 cybersecurity features

  1. Decentralization spreads data across many nodes, which reduces the risk of big data breaches and eliminates single points of failure. This setup makes it harder for attackers to compromise the entire system.

  2. Cryptography involves complex algorithms to secure data and transactions. It ensures that information is only accessible to those who are supposed to see it, keeping data confidential and integral.

  3. Immutable ledger is a record that no one can change once something is added. This transparency prevents tampering and builds trust among users, as everyone can see the transaction history.

  4. Smart contracts automatically execute transactions when conditions are met. This reduces the chance of errors and fraud since no human intervention is needed once the contract is set.

  5. Identity and access management (IAM) controls who gets access to what information. It verifies the identity of users and restricts access to sensitive data, ensuring that only authorized persons can see it.

  6. The Zero Trust model follows the principle of never trusting anyone by default, even if they are inside the system. It always requires verification, which minimizes unauthorized access.

  7. Tokenization turns rights to an asset into a digital token. This secures ownership and exchange of assets by encrypting the details and storing them on the blockchain.

  8. Privacy-enhancing technologies let people complete transactions without exposing personal information. Techniques like zk-SNARKs allow for transaction privacy, providing security without sacrificing confidentiality.

  9. Two-factor authentication (2FA) adds an extra layer of security by requiring a second verification, reducing the risk of unauthorized access.

  10. Permissioned blockchain allows organizations to manage who can join their network. This control over access makes private transactions more secure.

Together, these features build a safer Web3 environment, where data is protected and trust is a cornerstone.

Cybersecurity risks of Web3

Despite its robust security framework, Web3 is not immune to cybersecurity risks. Understanding them is the first step toward mitigating potential security issues.

Smart contract vulnerabilities

Sometimes, smart contracts on blockchain networks have flaws. These issues can allow unauthorized access or cause financial losses. Conducting audits on these contracts is a key part of keeping Web3 safe, as it helps find and fix these issues early.

Phishing attacks

Phishing attacks trick users into giving away sensitive information. They often target crypto wallet users with fake emails or websites. Teaching people about these dangers and using two-factor authentication can really help lower the chances of these attacks succeeding.

Front-running

Front-running is when someone acts on information about upcoming transactions in decentralized finance (DeFi) to their benefit. This practice can make decentralized apps less fair and secure.

Sybil attacks

A Sybil attack occurs when someone creates many fake identities to disrupt a decentralized network. This can undermine how decentralized apps work. Using strong identity and access management solutions is necessary to prevent such problems.

51% attacks

If a group gets control of most of a blockchain’s computing power, they can manipulate the network. Ensuring the mining power is spread out and making the blockchain technology more secure are good ways to stop these attacks.

DeFi exploits

DeFi platforms can have security weaknesses that might be exploited, leading to big losses. Doing regular checks on these platforms and their smart contracts helps find and address security gaps.

Rug pulls

Rug pulls occur when crypto project developers suddenly take all the invested money, leaving investors with nothing. Having clear transparency and community involvement can help avoid these scams in decentralized projects.

Privacy issues

Blockchain technology does make transactions more private and secure. But, there’s still a chance that transactions could accidentally reveal someone’s identity.

Network congestion

When blockchain networks get too busy, it slows down transactions and can raise costs. Developing scalable solutions and designing efficient networks are important to keep Web3 working smoothly and securely.

Regulatory compliance risks

As laws around Web3 keep evolving, staying on top of these changes is crucial for projects, especially those in DeFi and cryptocurrencies. Being aware of and following these laws helps Web3 projects avoid legal issues and succeed in the long run.

Best practices for staying safe in Web3

Adopting a proactive approach to security is essential in navigating the Web3 landscape safely. Here are key best practices to consider.

Web3 security best practices

Conduct regular security audits

Regular security audits, including smart contract audits, are crucial for spotting and fixing security vulnerabilities in smart contracts and decentralized applications (dApps).

During these audits, security experts examine the code to confirm its safety and correct operation. This kind of review is vital because it helps prevent potential exploits and attacks that could compromise the system.

Smart contract audits are a specialized part of these examinations, focusing on the integrity and security of the contracts that automate operations and transactions on the blockchain.

Implement two-factor authentication (2FA)

2FA adds an extra layer of security beyond just a password, requiring users to provide a second piece of evidence of their identity. It’s crucial for protecting accounts, especially for crypto wallets and exchange platforms. Major crypto exchanges advocate for using 2FA.

Use a hardware wallet for crypto assets

Storing crypto assets in a hardware wallet is one of the safest methods, as it keeps the assets offline and out of reach from online threat actors. Hardware wallets have proven effective against many Web3 security threats. They are particularly suitable for individuals and companies holding significant crypto assets.

Educate yourself and your team

Education on Web3 security is fundamental. Understanding the landscape of security threats can empower individuals and organizations to make informed decisions and adopt safe practices.

This includes learning about phishing scams, the importance of private key management, and the latest security threats. Companies like the Ethereum Foundation often host workshops and provide resources, underscoring the importance of continuous education in mitigating security risks in Web3.

Leverage decentralized identity solutions

Decentralized identity solutions offer a secure and privacy-preserving way of managing identities online. By allowing users to control their identity without relying on central authorities, these solutions reduce the risk of identity theft and fraud. Microsoft’s ION, a decentralized identity network built on the Bitcoin blockchain, showcases how such technology can be implemented.

Keep software and wallets updated

Regular software and wallet updates ensure that you have the latest security enhancements and bug fixes. Developers constantly update their applications to address new threats and security vulnerabilities. Neglecting updates can leave you exposed to security risks that have already been fixed in newer versions. This practice is crucial for all users and companies in the Web3 space to maintain high levels of security.

Practice safe transaction habits

Safe transaction habits include double-checking addresses before sending crypto, using trusted platforms, and verifying smart contract actions. These habits can prevent common mistakes that lead to losses.

While this practice is fundamental for everyone in the Web3 ecosystem, it is especially critical for businesses engaging in frequent and large-scale transactions.

Monitor smart contract and wallet activities

Monitoring tools can provide real-time alerts on suspicious activities, helping users and developers react quickly to potential security threats. This proactive approach can prevent significant losses by detecting unauthorized transactions or changes in smart contract behavior.

Platforms like Etherscan offer services that enable both individuals and companies to keep an eye on their assets and smart contracts, enhancing overall Web3 security.

Use secure communication channels

Secure communication channels are vital for discussing sensitive information, such as transaction details or private keys. Encrypted messaging apps or secure email services can protect against eavesdropping and phishing attacks. This practice is particularly important for organizations that handle large amounts of sensitive data, ensuring that internal communications are not vulnerable to security risks.

Implement a robust access control system

A robust access control system ensures that only authorized personnel access critical systems and information. This can include using multi-signature wallets for company funds and Identity and Access Management (IAM) solutions for controlling access to sensitive data. Such measures are crucial for organizations to protect against insider threats and unauthorized access.

Plan for incident response

Having an incident response plan in place is critical for quickly addressing security breaches. This plan should include steps for isolating affected systems, communicating with stakeholders, and conducting a post-mortem analysis to prevent future incidents. Additionally, some companies offer services that help track stolen funds.

Participate in bug bounty programs

Bug bounty programs encourage the discovery and reporting of vulnerabilities in software and systems. Participating in or hosting such programs can uncover and resolve security issues before malicious actors can exploit them. Several platforms host bug bounty programs for various Web3 security projects.

Diversify asset holdings

Diversifying asset holdings can mitigate the risk of major losses due to attacks or downturns in specific cryptocurrencies or platforms. By spreading investments across different assets and storage solutions, individuals and companies reduce their exposure to any single point of failure.

This strategy is particularly relevant in the volatile Web3 market, where the value and security stability of assets can dramatically change. Real-world examples include investment firms and crypto funds that allocate their portfolios across various blockchain networks, crypto assets, and DeFi platforms to safeguard against unforeseen security threats.

Conclusion

Web3 technology, with its decentralized networks, smart contracts, and tools that enhance privacy, plays a key role in making the digital world safer and more trustworthy. Decentralization spreads data across several places, which makes it more resilient against attacks and breaches. Cryptography keeps transactions and data safe, while records that no one can change boost transparency and trust. All these parts work together to create a strong foundation for Web3 cybersecurity, offering new ways to secure digital interactions.

Yet, diving into Web3 comes with its own set of challenges. Issues like security vulnerabilities in smart contracts, phishing attacks, and other security threats are real concerns that need careful attention.

When considering moving to Web3, it’s wise to take a careful but positive stance. The opportunity Web3 offers to change how businesses operate and interact with customers is immense. However, stepping into this new territory should be done with a solid plan for security.

It’s important to carry out regular security audits, which include checking smart contracts thoroughly to spot and fix any weak spots. Using two-factor authentication, teaching teams about the security risks they might face, and using advanced security measures like IAM and Zero Trust solutions are all effective ways to reduce these risks. To ensure your business is secure as you navigate Web3, NordLayer offers the tools and support you might need. Our sales team is here for you; don’t hesitate to reach out.

About Version 2 Digital

Version 2 Digital is one of the most dynamic IT companies in Asia. The company distributes a wide range of IT products across various areas including cyber security, cloud, data protection, end points, infrastructures, system monitoring, storage, networking, business productivity and communication products.

Through an extensive network of channels, point of sales, resellers, and partnership companies, Version 2 offers quality products and services which are highly acclaimed in the market. Its customers cover a wide spectrum which include Global 1000 enterprises, regional listed companies, different vertical industries, public utilities, Government, a vast number of successful SMEs, and consumers in various Asian cities.

About NordLayer
NordLayer is an adaptive network access security solution for modern businesses – from the world’s most trusted cybersecurity brand, Nord Security.

The web has become a chaotic space where safety and trust have been compromised by cybercrime and data protection issues. Therefore, our team has a global mission to shape a more trusted and peaceful online future for people everywhere.

×

Hello!

Click one of our contacts below to chat on WhatsApp

×